ChatGPT Study | Walkthrough
Overview
In this ChatGPT demo, which you can also import into your account and use as a template for building your ChatGPT study, you can see that when a participant writes a prompt, the answer from ChatGPT appears right in Labvanced!
As shown below, there is a chat area where all the history is shown and an input field where the participant writes in their prompt:
This is how the demo looks like in action together with the recorded data which is shown at the end of the video:
In this walkthrough, we will discuss step-by-step how to set up a ChatGPT study so you can get familiar with its contents and start incorporating this powerful feature in your next study!
Note: In order to establish a connection with ChatGPT in your study, you need to input your own, unique API key in the Study Settings tab under the Experiment Features column by activating the option dedicated to Open AI Integration.
Variables in the ChatGPT Task
Variables hold and store recorded data, including string and numeric values. Very often, researchers that are comfortable with using Labvanced, will create a variable right on the spot, like when creating an event.
For the purposes of this demo, we will list the variables in advance as described by the upcoming section:
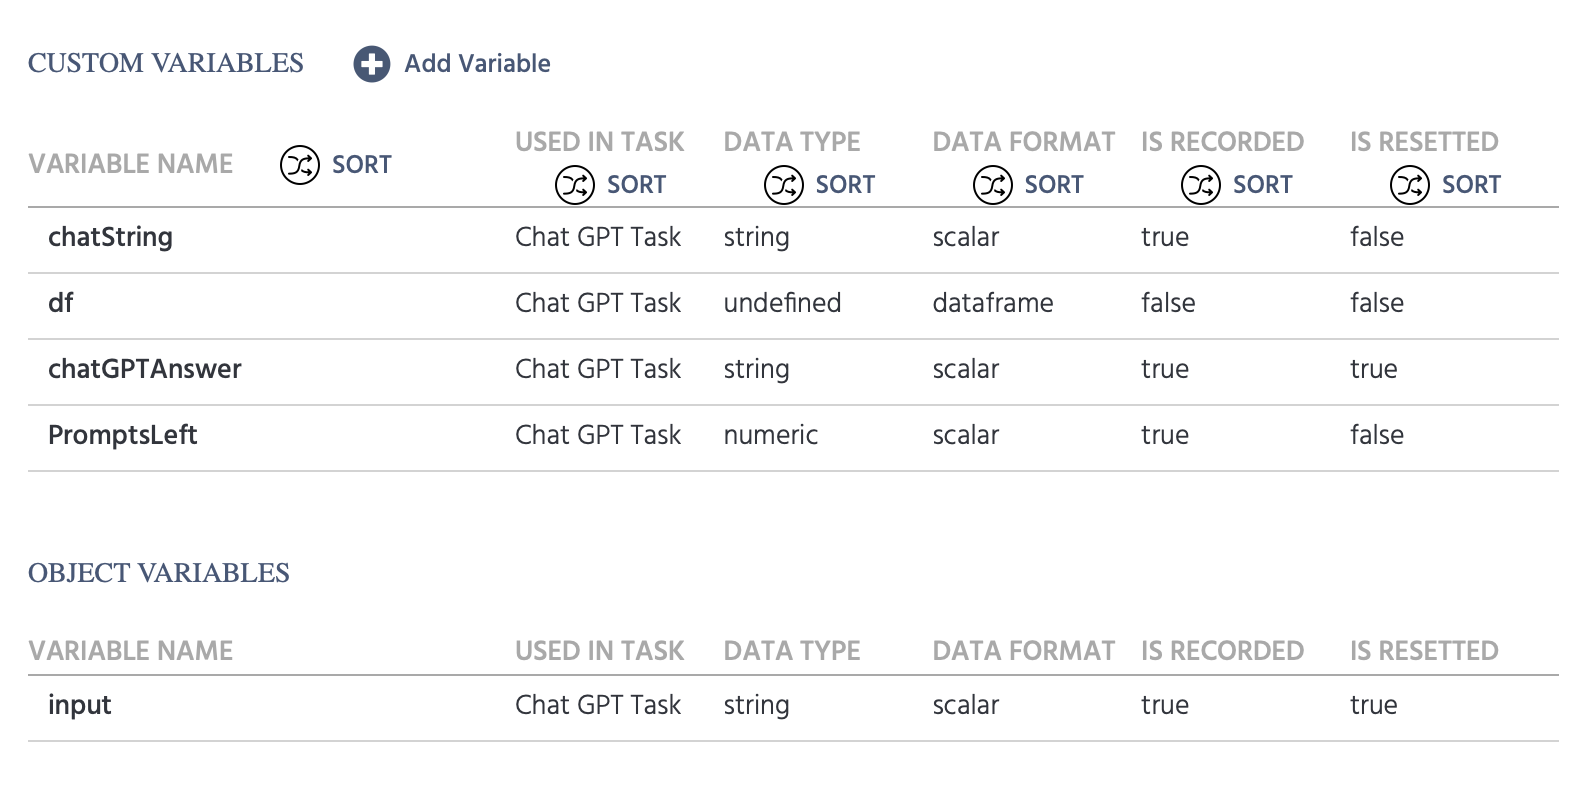
| Variable Name | Description |
|---|---|
chatString | This is the variable that will hold the entire chat string and essentially format the line in the chat that shows the prompt from the participant and the message from ChatGPT which will be explained in greater detail in the events section below. Additional Variable Settings:
|
df | This is a 2-column .csv file that is uploaded as a data frame variable. |
chatGPTAnswer | This variable is automatically recognized by the system when you call on it [explained further down]. No need to create it at this point but we are listing it as it will be mentioned later. Additional Variable Settings:
|
PromptsLeft | For this demo, we want to allot participants 5 prompts. So we need to create a numeric variable that starts off with a value of 5 and then use events to decrease that counter each time a prompt is sent over to ChatGPT. Additional Variable Settings:
|
Input | This variable will be created as soon as you enter the input field object onto the editor. This stores the value of what the participant types in as their prompt to ChatGPT. Additional Variable Settings:
|
Add Objects to the Canvas
To set up the chat interface and present the instructions, several different types of objects need to be added to the canvas, as will be described below.

Display Text Objects
Display text objects are necessary for this ChatGPT study in order to:
- Present instructions
- Show the chat history on the screen
In this demo we have created and named the following display elements:
| Display Text Name | Description |
|---|---|
Chat Box | The Chat Box is essentially where all of the prompts from the participant and the answers from ChatGPT will appear in a chat-like format. Inside this element, there is a linked variable called chatString that will display the chat strings from the participant and the ChatGPT answers. Directions: Add the display element, resize it to be large, change the placeholder text to say something else like ‘text’, highlight it, in the text editor click the red [x] at the top and select the ChatString variable from the menu. The Start value text will now appear. |
Top Instructions | The Top Instructions contain the instructions for the participant and include a linked variable called PromptsLeft that will show how many prompts the participant has left to use. |
Creating a Chat Box Effect
Before we dive in deep, let’s talk about the chat box where the conversation will be displayed.
As Labvanced is an app that works in the browser, it renders from the top of the screen to the bottom. This influences how information is presented. In order to create a chat-like effect, we have to input a CSS command for the Chat Box object in order for the chat text to be reversed, with newer text being displayed at the bottom (we want this because this is how chat looks like in real life with the newer messages appearing at the bottom).
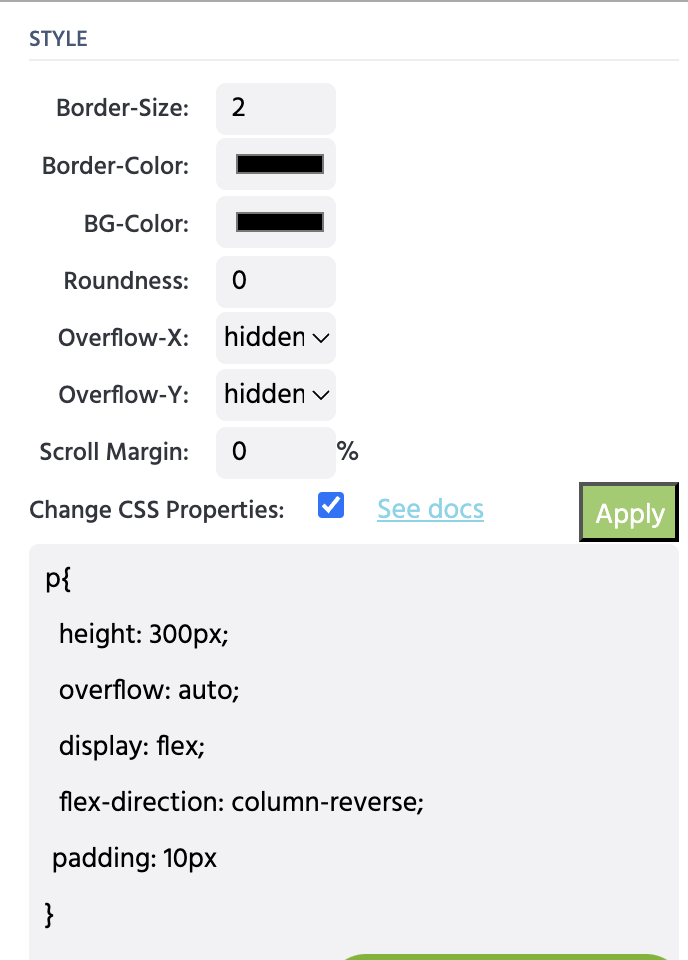
To create this effect, you simply select the Chat Box object and on the right panel where the object properties are listed, scroll down to the area for Change CSS Properties and insert this snippet of code: p{ height: 300px; overflow: auto; display: flex; flex-direction: column-reverse; padding: 10px }
This is accomplished with the column-reverse CSS style option which essentially reverses the flow of the text, ultimately showing the newer message at the bottom of the chat, instead of the top.
This should look like this:
As soon as you input this snippet of code, the name of the ChatString variable will jump to the bottom of the object.
Using this same Object Properties panel, you can also also specify the style of the chat box by assigning a Border-Size and Border-Color which, in the example above, has the Border-Size set to 2 and the Border-Color as black.
Starting Value: Text Inside the Chat Box
Generally speaking, when someone accesses ChatGPT, there is some kind of prompt message, along the lines of ‘Hi, how can I assist you today?' You can add such a starting message by accessing the created variable (that is linked within the Chat Box object) and giving it a Start Value by typing it in under the Variable Properties.

As shown above, we use the following starting message in this demo: Welcome! Please start typing in the input field below to begin 😃 <br><br>
Note: The <br> is an HTML tag for creating a line break in the text so that a new line is created when a new line of the chat is created and appended within the chat box.
Input Field
The input field is where the participant will write their prompt which will be sent to ChatGPT. To create one, simply insert an input object from the object panel on the side of the editor.
Upon inserting it, you will be prompted to name the variable that is associated with this object. For this demo, we named this object input.
IMPORTANT: Also, to further control the options associated with this particular object, under the Object Properties right-side panel, when this object is selected, make sure that the following options are indicated:
Show Question Header:option is deselectedInput typeis selected to betext.Focusedis marked astruewhich will make the typing field active (ie. the participant doesn’t have to click in it every time in order to be able to type).
Events Overview
Events are necessary in this ChatGPT study in order to accomplish the following actions:
- Display and send the participant’s prompt to ChatGPT
- Receive and display the ChatGPT answer
- Record the chat strings (written by the participant and created by ChatGPT)
- Progress to the next trial
For the purposes of this walkthrough, we created and named two main events under which the above actions will be addressed:
- Outgoing event: ie., sending a message to ChatGPT and displaying it in the chat
- Incoming event: ie., receiving a message from ChatGPT and displaying it in the chat
OUTGOING EVENT
The outgoing event refers to actions that will happen when the participant sends out his inquiry to ChatGPT, ie. it’s the information that is outgoing from Labvanced and to OpenAI.
With this event we aim to:
- Present the written text from the input field in the chat area
- Save the participant’s written prompt as variable data
- Send it to ChatGPT
Trigger
The trigger that activates this event is the Enter on Input trigger type with the specific target being the input object we created previously. Thus, when the participant presses enter while using this object, this event will trigger.

Actions
Upon specifying the above, we move on to define the actions that occur as a result of this trigger.
Together, this variable will package the participant’s query (the input) into a chat-like format by preceding it with the text ‘You:’ and then adding a breaking space in order to start a new line.
- The
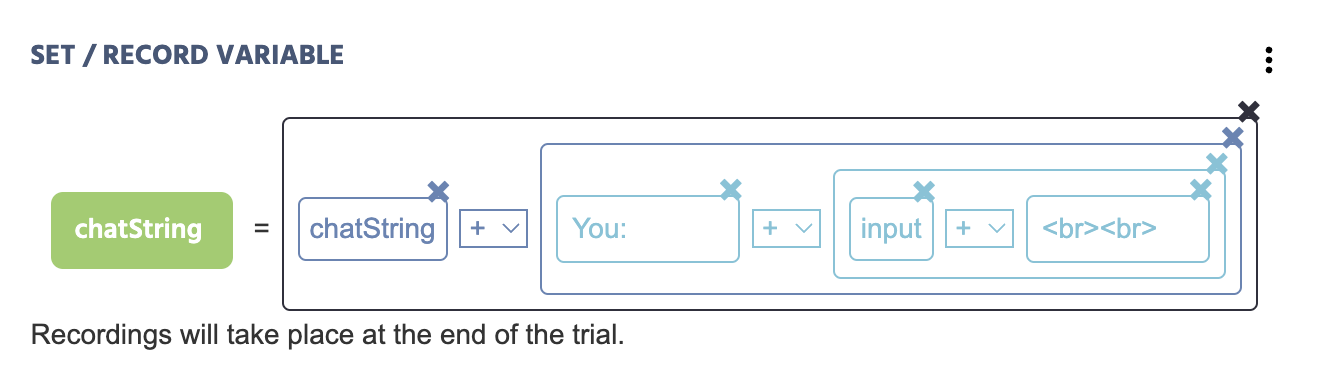
Set/Record Variableaction contains thechatStringvariable that we have created previously. - There are several
Arithmeticoperations within it which essentially create the effect of a chat. When combining string elements with the (+) you are appending and making the string longer by combining variables and values. - Here is an explanation of the values within this arithmetic operation:
ChatString: Calls on the specific variable and then the rest that follows will append to it.You:A constant string value that you just type in to give the participant their label.input: The Variable namedinputie. what the participant typed into the input field will now display here in the chat box.<br><br>: A constant string value that is how a new line is created using the HTML<br>.
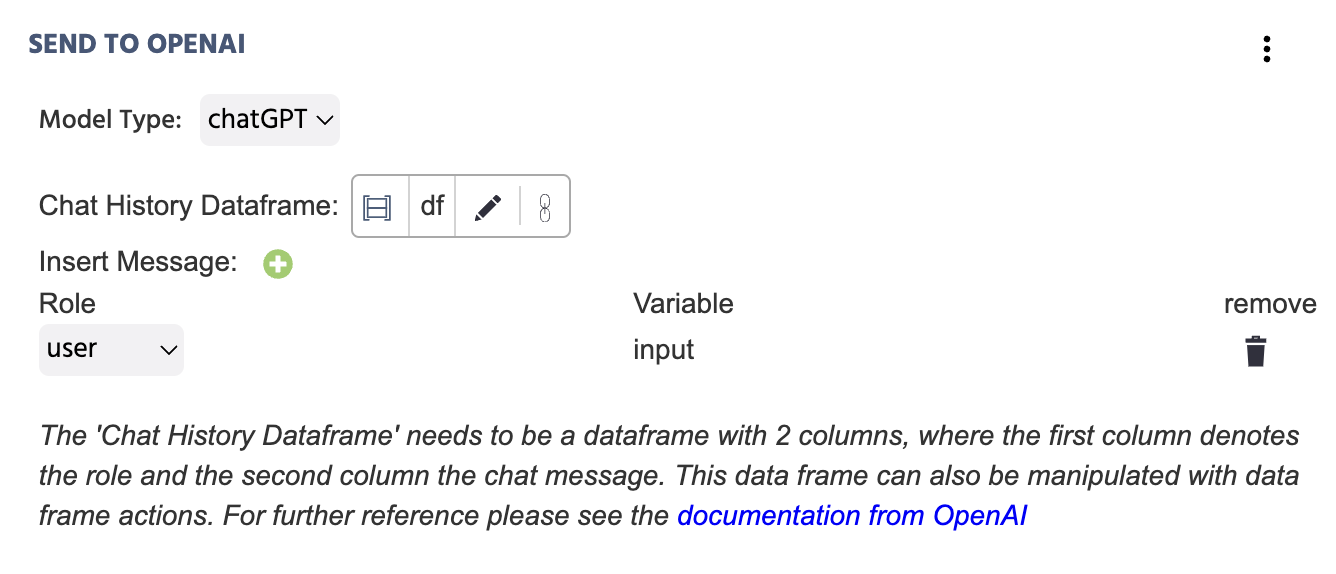
The second action we have in this event is the Send to OpenAI action which utilizes an API to send what the participant wrote (ie. the input variable’s contents) to OpenAI.
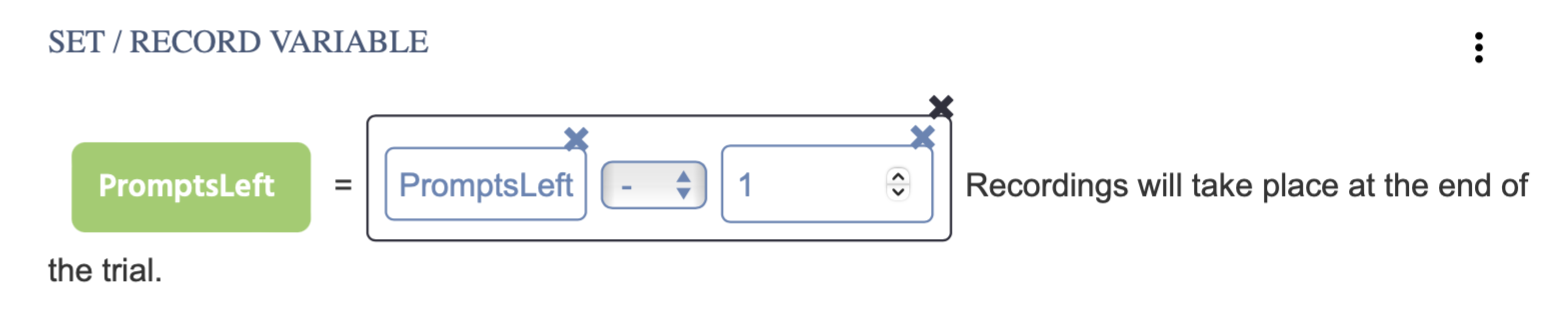
We also want to decrease the variable value of PromptsLeft by 1 (remember at the beginning we allotted the participant to be able to send 5 prompts).
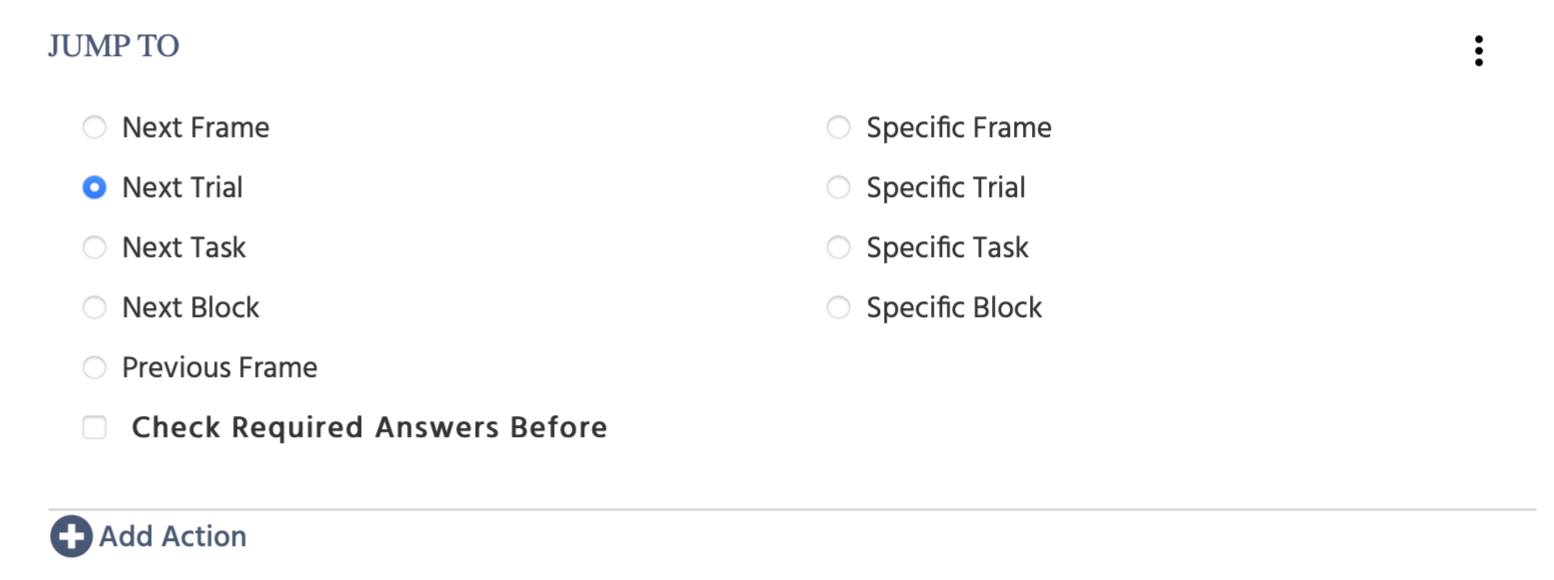
Once the participant presses enter we also want them to move on to the next trial. So for that we used a Jump Action and specified Next Trial.
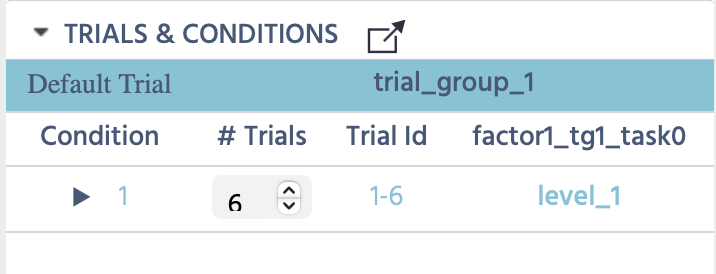
NOTE: We created 6 trials for this ChatGPT study and you will understand later in the section below that shows the data recorded. Of course there are many ways to handle how trials are used and for this demo we chose this approach. If you have any questions, please reach out to us!
INCOMING EVENT
Typically, it takes time, about 100-500 milliseconds to get a response from ChatGPT. Once the response is received, then it can be used as a trigger to:
- Record the response as a stored variable
- Present the answer visually in the chat
- Navigate to the next trial
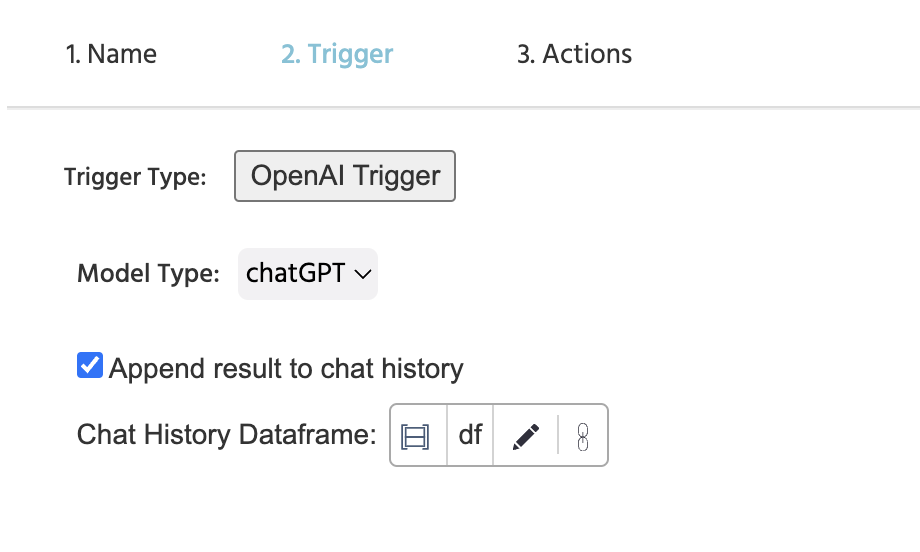
Trigger
The OpenAI Trigger utilizes the API to receive the answer from ChatGPT and then store that value into the 2-column data frame (named df here) that we created previously.
Actions
Upon specifying the above, we move on to define the actions that occur as a result of this trigger.
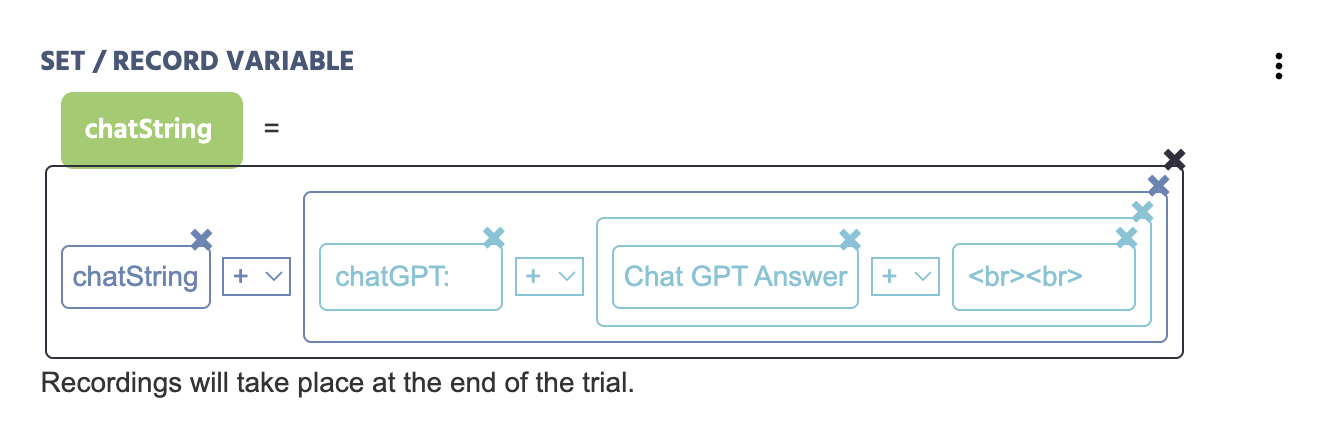
In a similar way that we displayed the participant’s input in the previous step, we will now do the same to show ChatGPT’s answer in the chat.
The difference here is that instead of ‘You:’ we write ‘chatGPT:’ as the constant string value to preface the answer in the chat… and instead of the ‘input’ variable we call on the Chat GPT Answer by choosing it as the trigger-specific value that is listed when clicking the pen icon.
The action below is also added in order to record the ChatGPT Answer (that is automatically received from the API) as its own value.

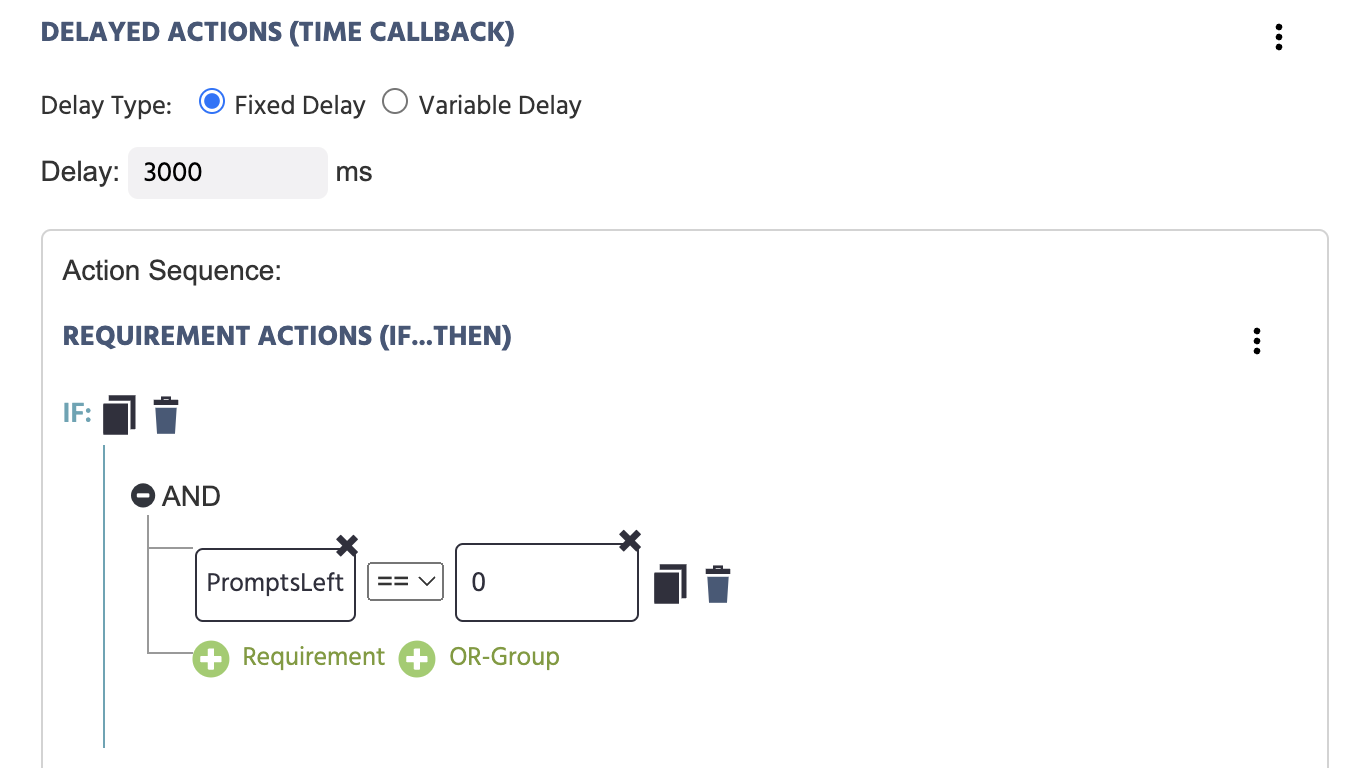
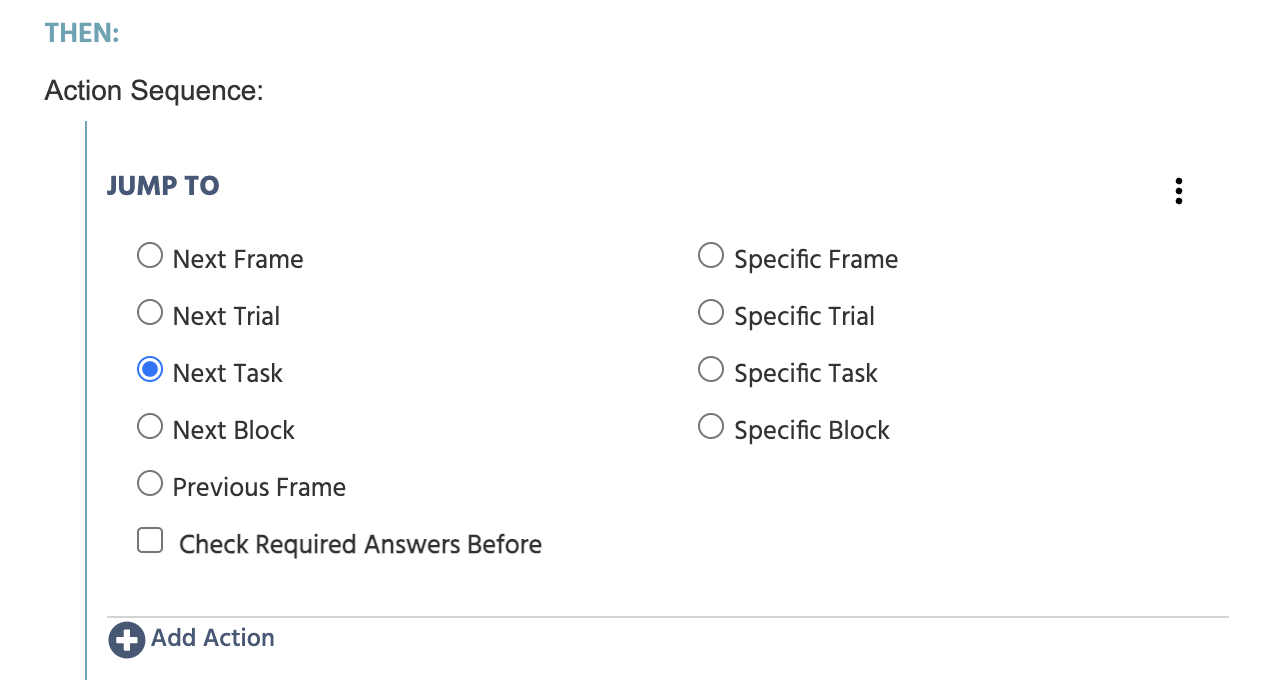
Because the task will automatically end when the number of Prompts reaches to =0, we want to give a participant the chance to read the last answer from ChatGPT, so we delay the last trial ending by 3000ms using a Control Action called Delayed Action where the Requirement Action stipulates that if the PromptsLeft variable is equal to 0 then the experiment progresses to the Next Task.
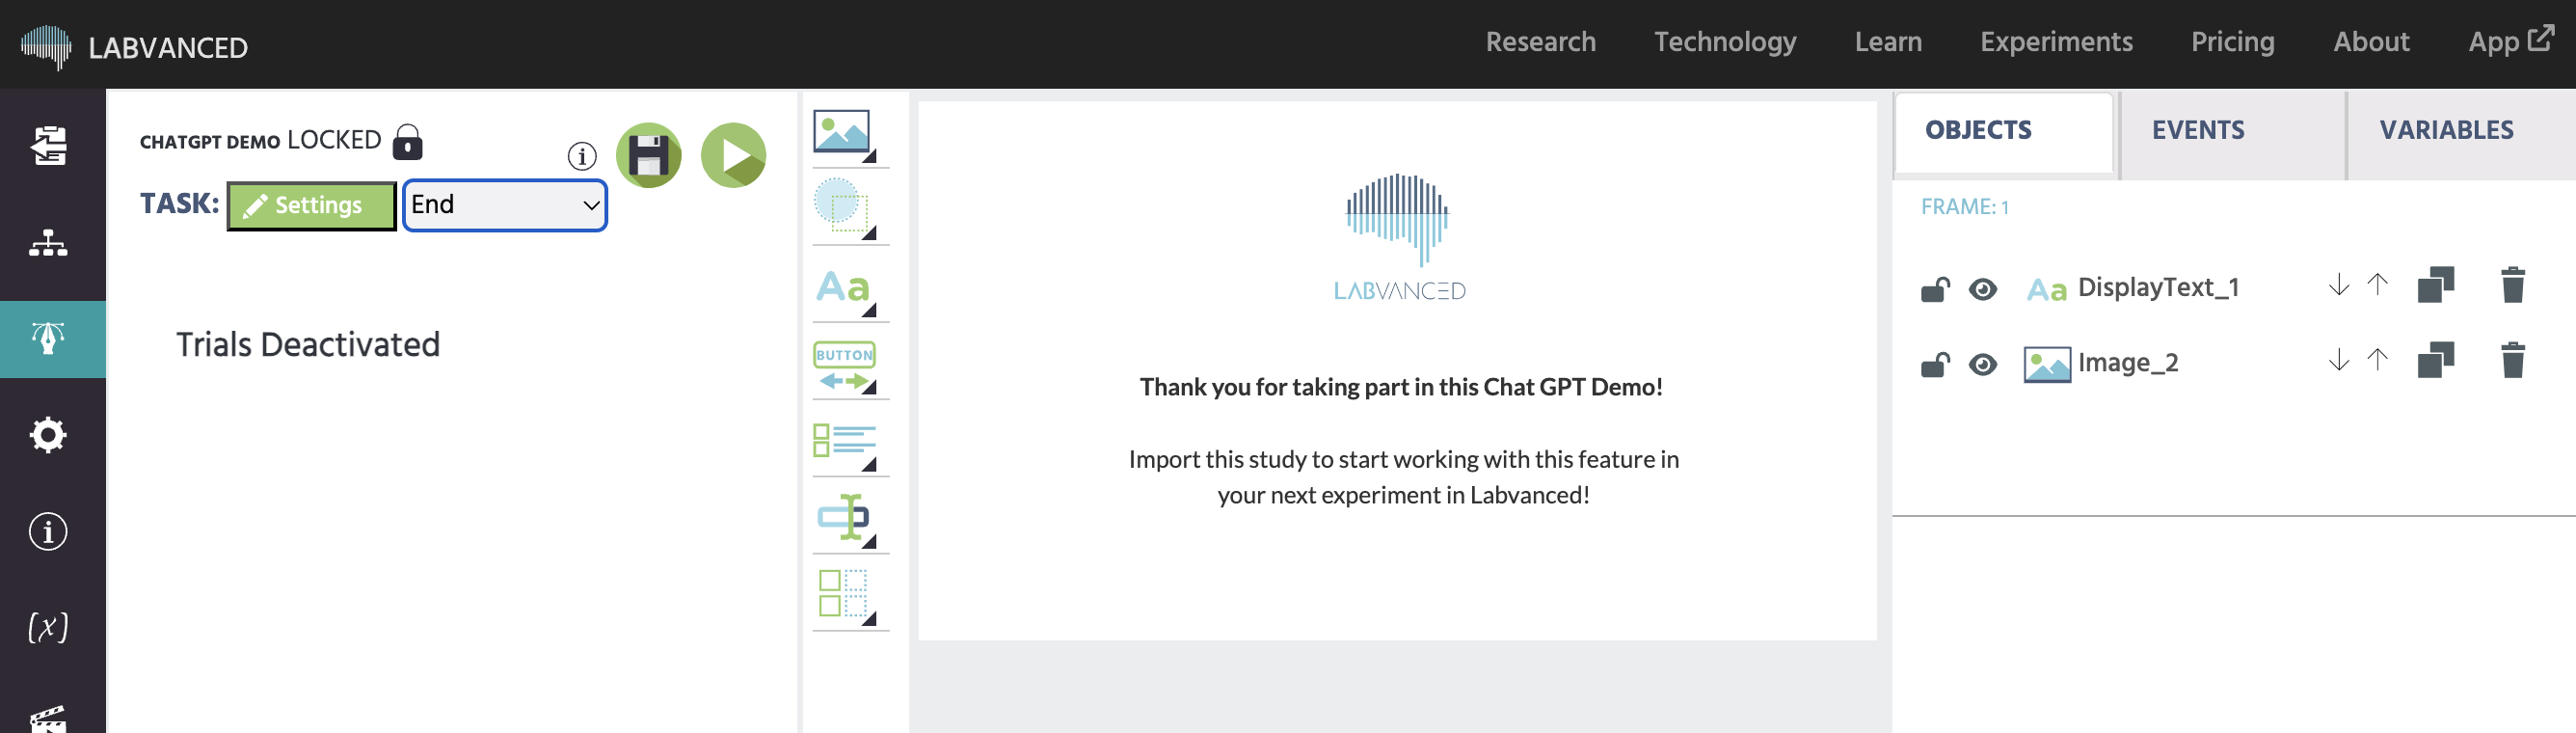
End Screen and Saving Data - Task 2
In our case the next task is called ‘End’ and is a thank you screen where the experiment is set to accept the session, ie. the study is over.
Accept Session Event
In order to save the data from the study, we want to accept the session and end the study when the participant reaches this point.
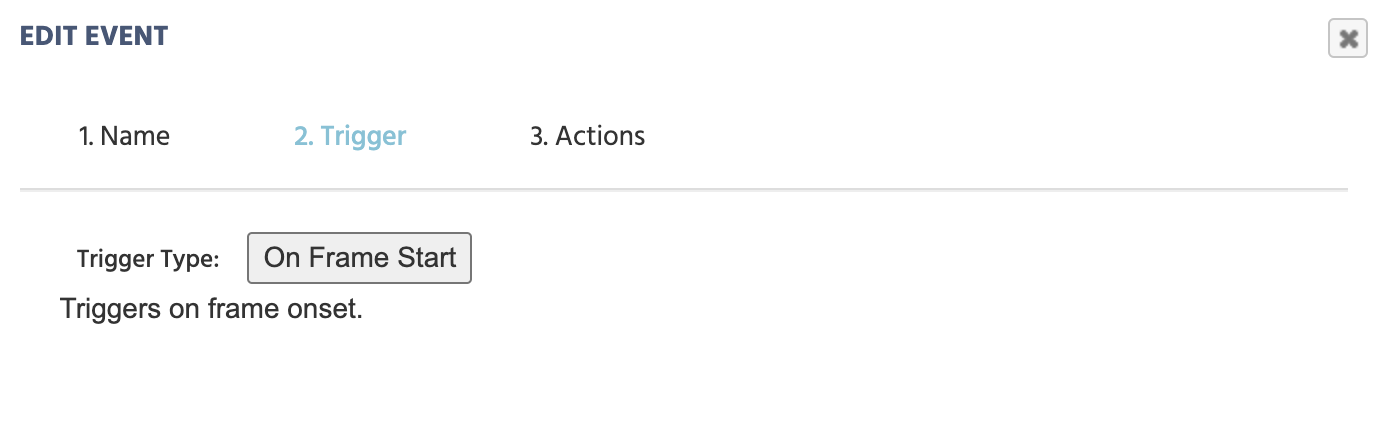
Trigger
Thus, the trigger is On Frame Start:
Action
Using another Delayed Action the Jump Action → Accept / End Session is used to save the data.
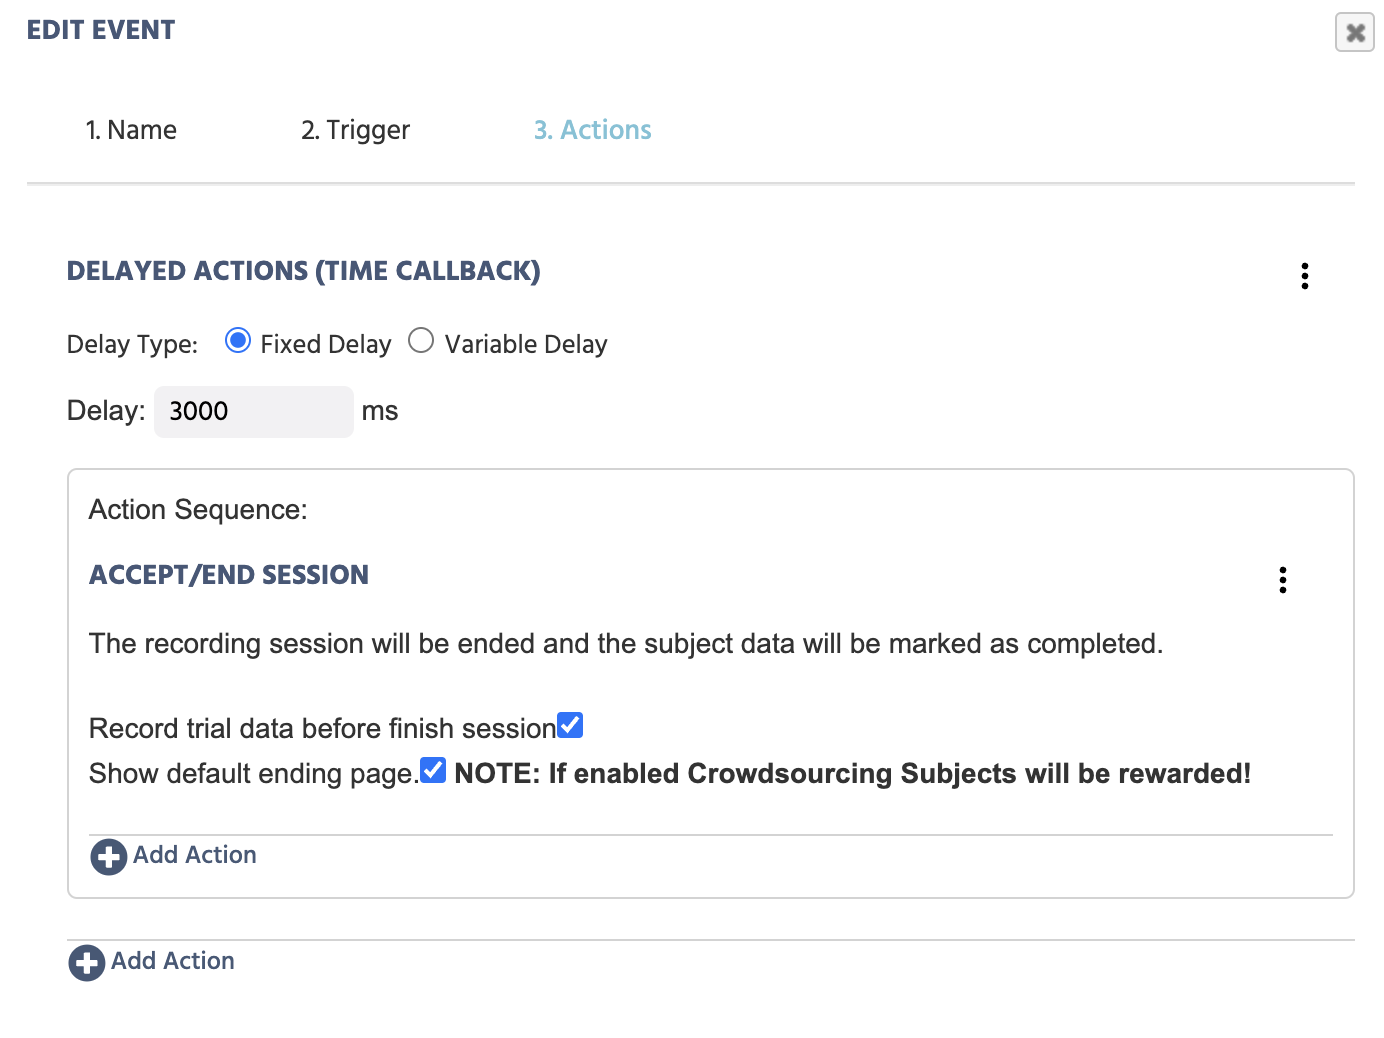
We use the Delayed action because the study will automatically close/end after the time has passed and we want to give the participants the time to read what is on the screen before the study ends.
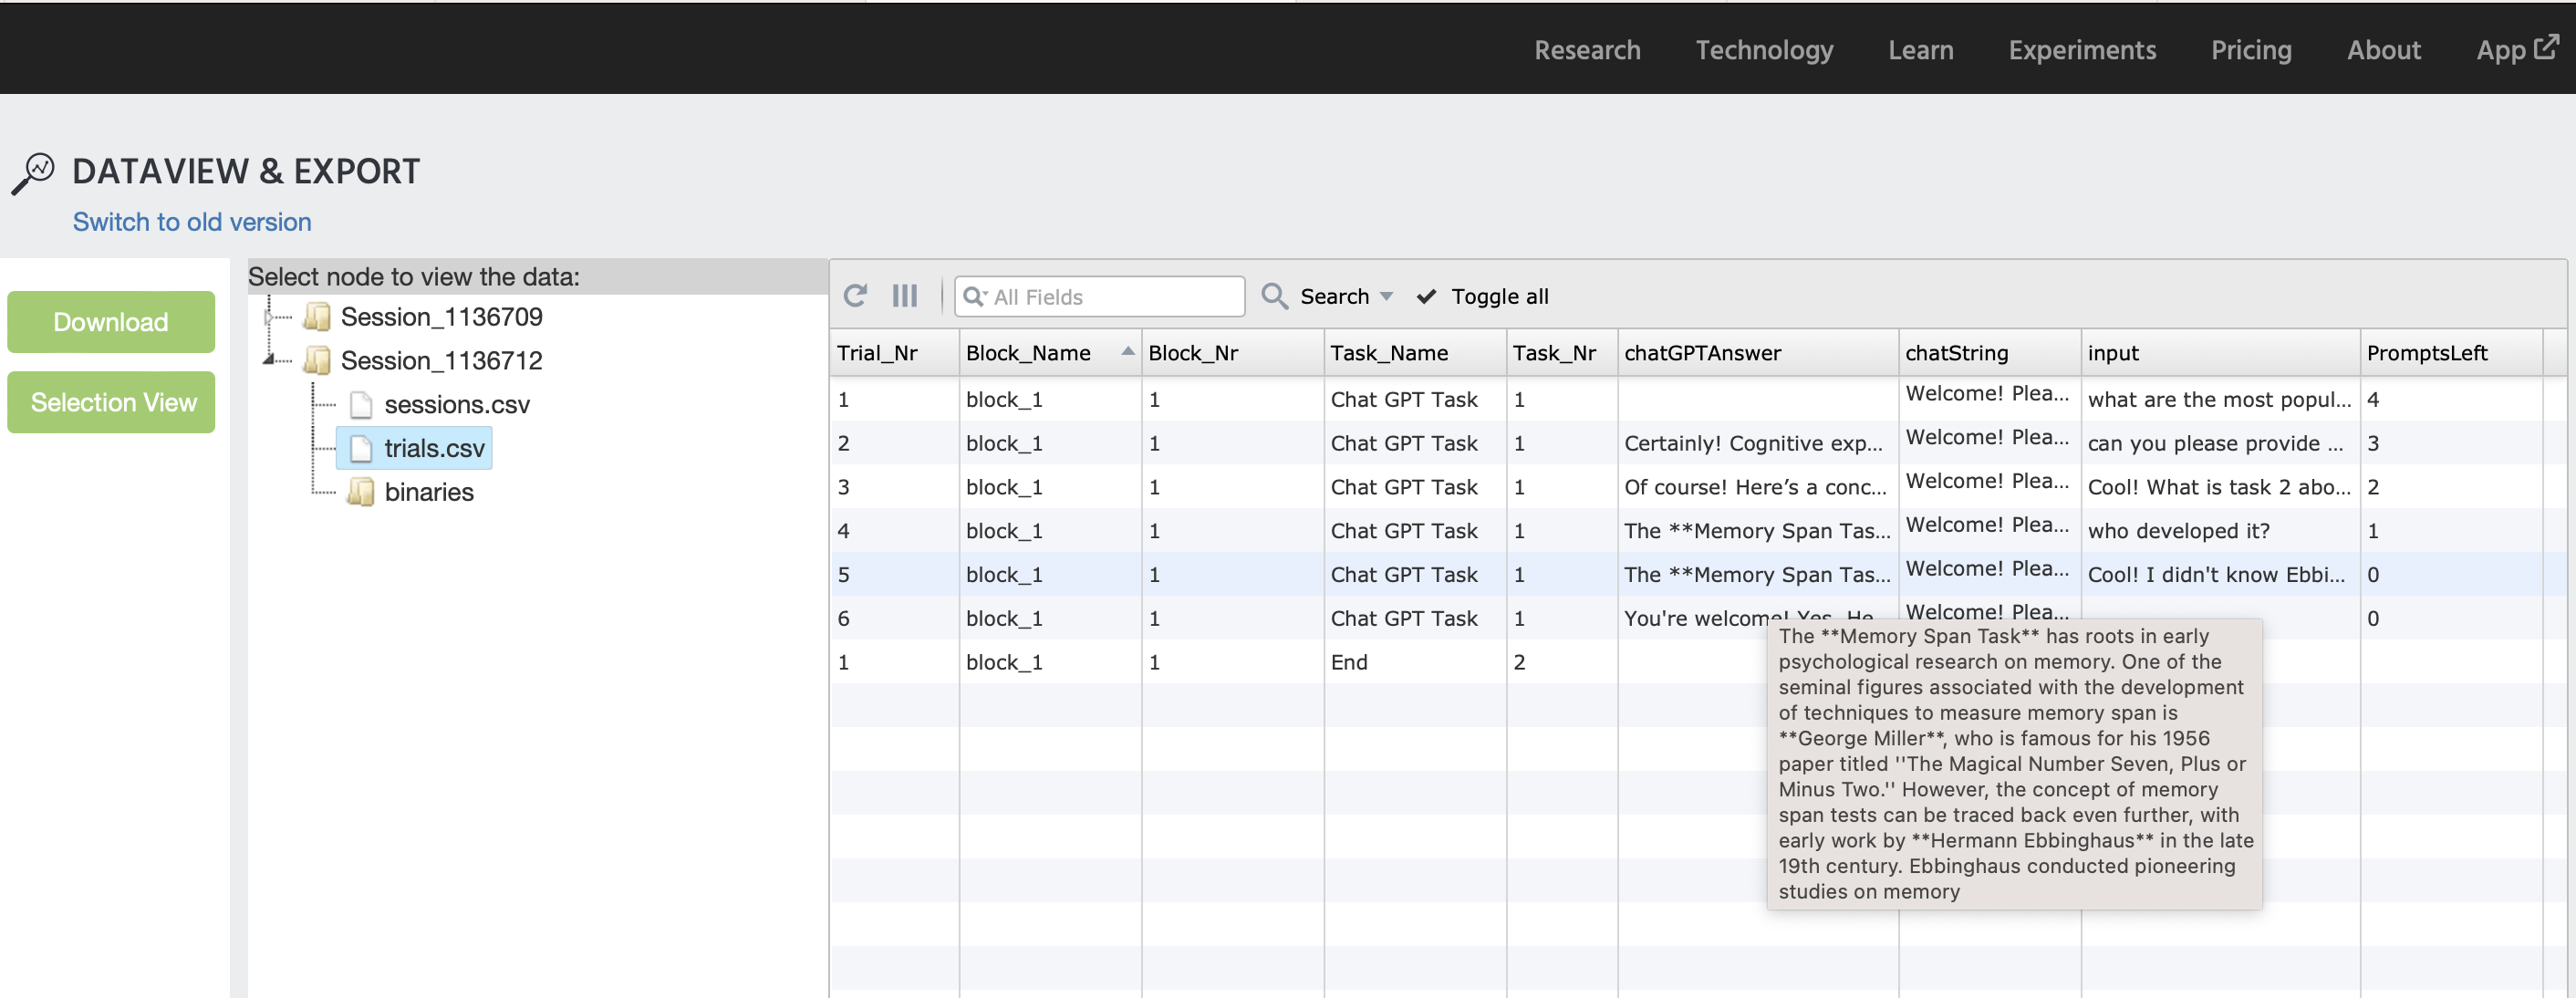
Recorded Data Preview of ChatGPT Demo
The image below captures how the data from this study set up will look like in the Dataview and Export Tab where the trial numbers (Trial_Nr), task name (Task_Name), chatGPT Answers, and participant prompts (input), as well as the number of prompts left (PromptsLeft) are shown:
Conclusion
All in all, this demo showcases how you can utilize the ChatGPT feature to create an interaction and dialogue between the participant and ChatGPT while saving the inputs and responses as variable values.
There are many approaches and ways that this feature can be used to build a ChatGPT study. So please reach out to us if you have any questions!