Trial System
Description
In the task editor, the trial system is located on the left side of the screen. In general, the trial system is used to create several repetitions (trials) of a task and is an essential part of the task creation process.
The trial system consists of two major sections:
- Factors & Randomizations: The classifications created based on factors of interest, as well as randomization factors in the experiment design.
- Trials & Conditions: The trials and conditions created by crossing the factors and levels created with
Factors & Randomizations.
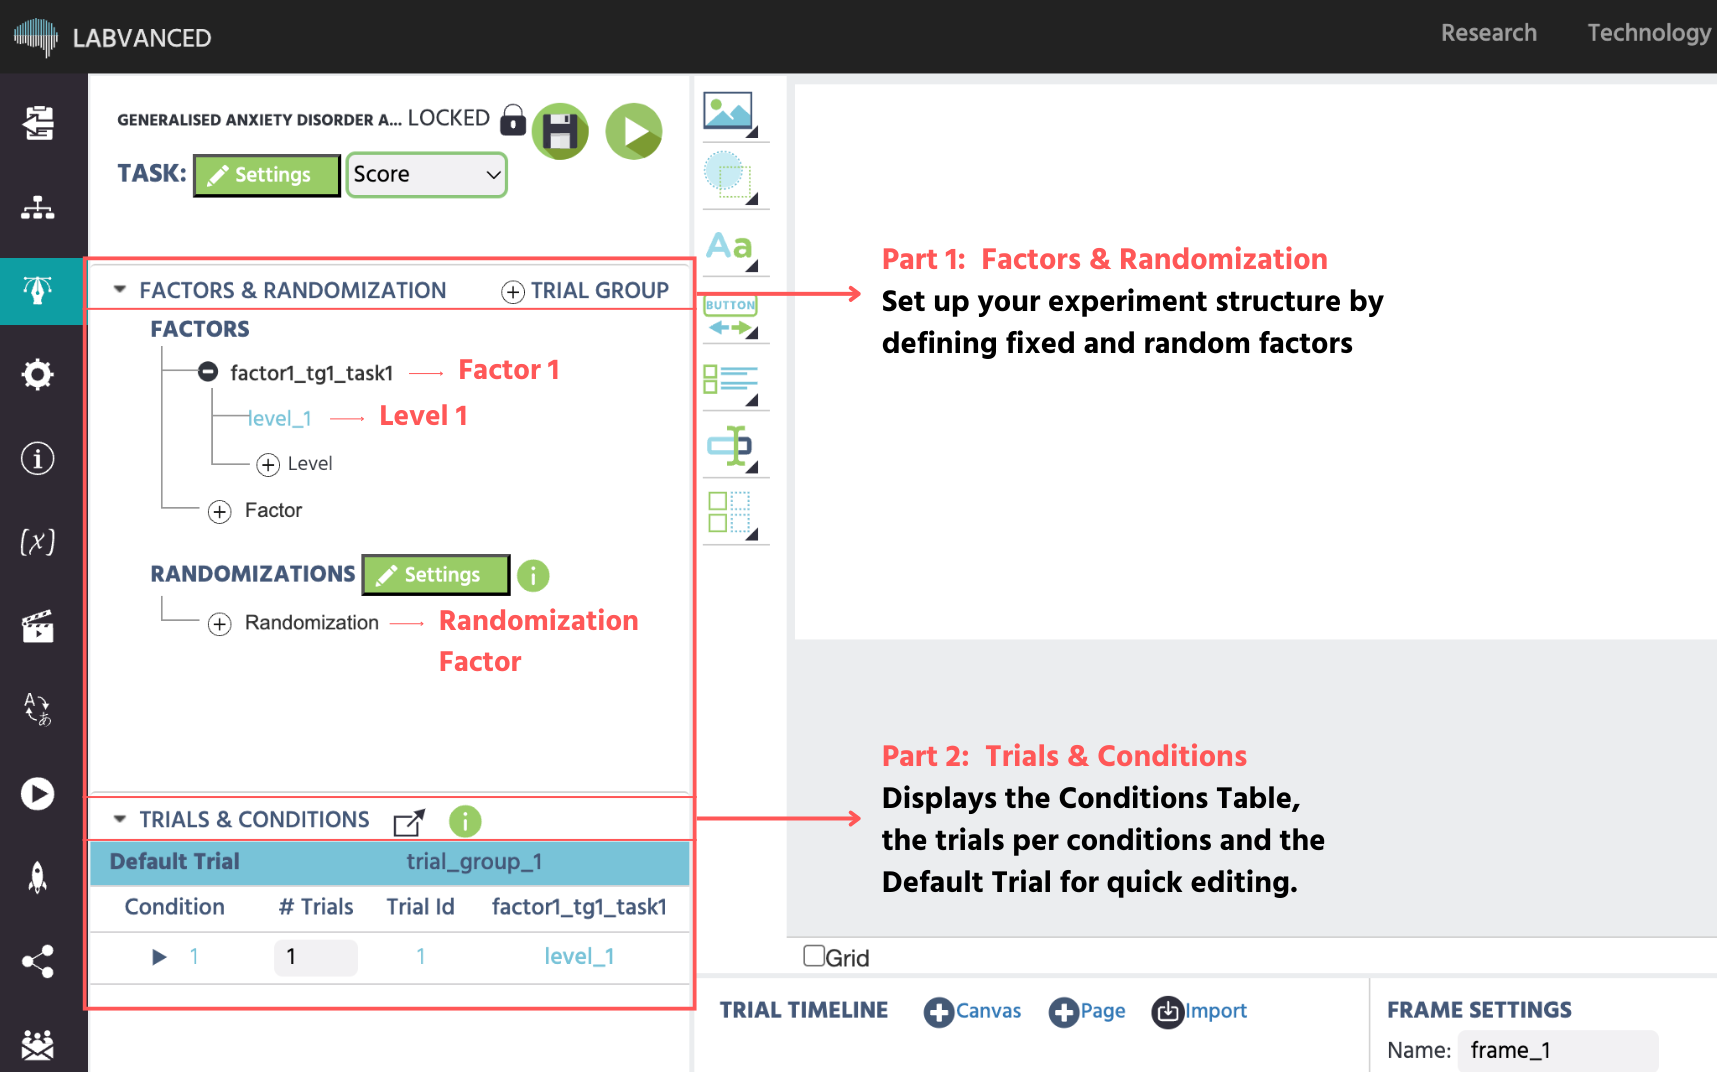
When the Factor Tree is edited by changing trial groups, factors, or levels, the Condition Table under the Trials & Conditions is automatically updated based on the settings in the Factor Tree.
📌Hands-On Example: Setting up your experimental factors and levels in less than one minute: The video below demonstrates how straightforward it is to utilize Factors and Levels in Labvanced for establishing a basic experimental structure:
Factor Tree
The factor tree can be used to change and modify the top hierarchical structure of a task. Specifically, it is there to modify the 3 top elements of the task hierarchy:
- Trial groups (contain factors and frames)
- Factors (contain levels)
- Levels (are crossed to create conditions)
Workflow Tip: The names of factors and their levels must be different from other factors and levels. To keep your study organized and the event logic clear, avoid similar-sounding labels such as "level 1" and "level 1.2" for your conditions.
The image below represents what these sections look like in a developed study.
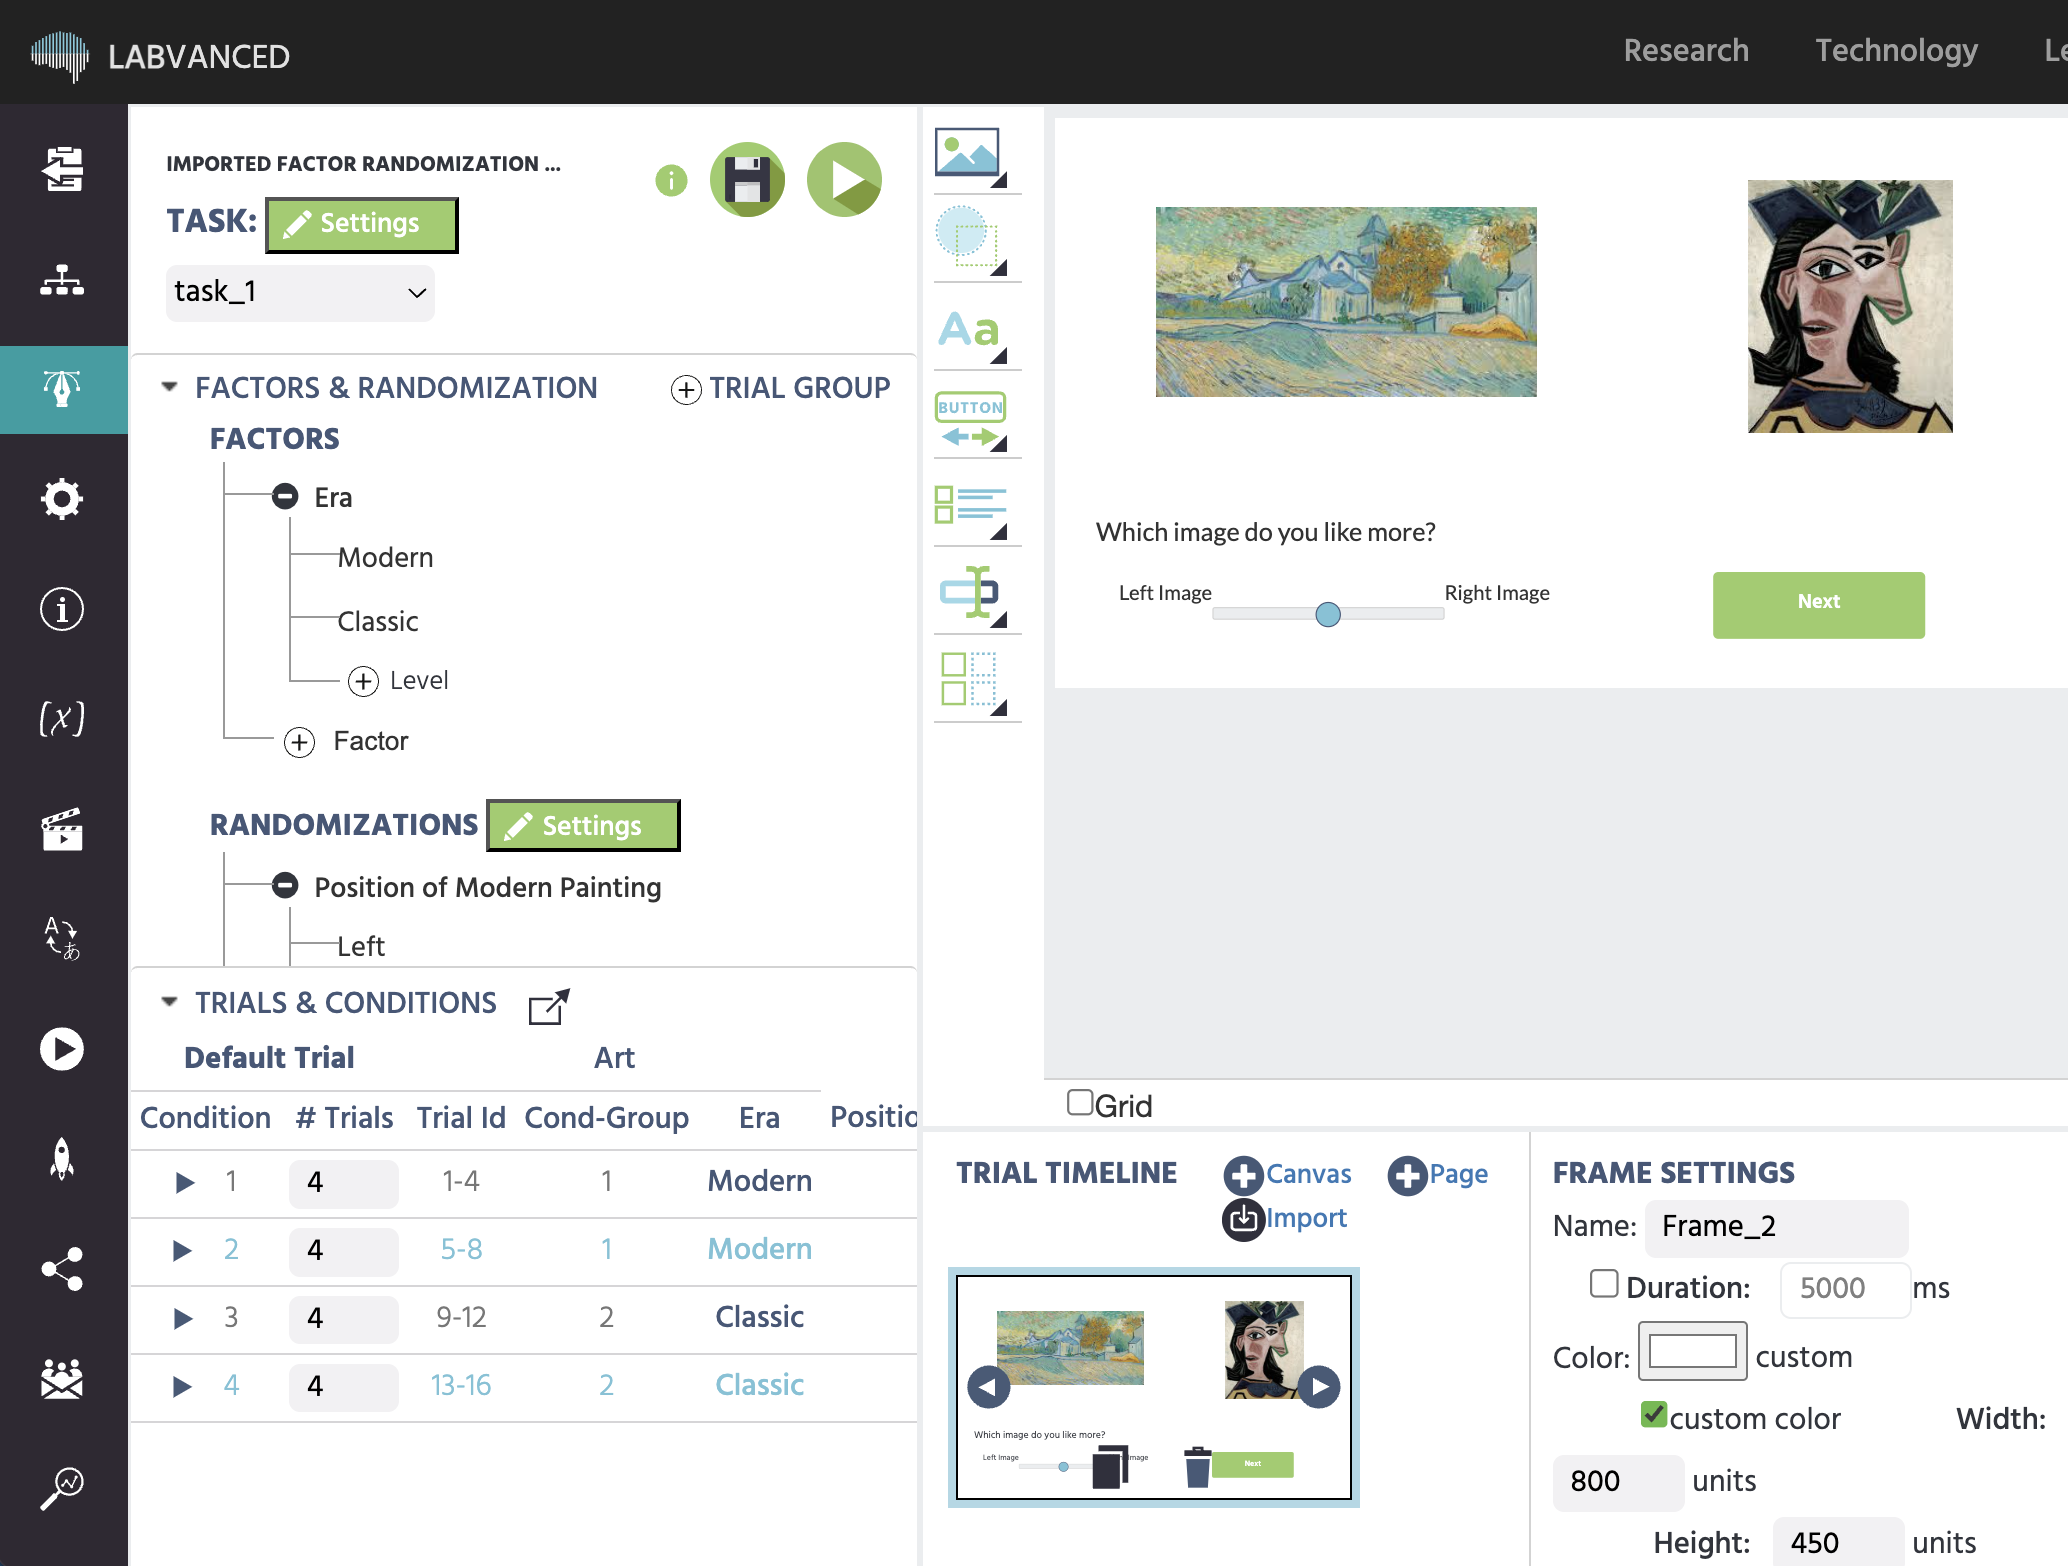
A factor named Era has two levels named Modern and Classic
Workflow Tip: Avoid creating large quantities of levels that only have one trial in each. This causes the study to be very crowded and disorganized. A better structure would be to have a few levels (or conditions) with multiple trials in each.
Trial Groups
The trial group acts as a container for a group of trials within the task which are roughly similar. Most importantly, all trials within a trial group have the same series of frames, with the same objects and events on them (although properties of objects and/or events can change from trial to trial). The trial group sets the overall structure of a trial. Each task needs at least one trial group.
As with most experiments, very different types of trials should be intermixed (e.g normal and catch trials). Multiple trial groups within a task can be used to create and intermix very different trials.
Factors
By adding Factors to a trial group, the user can create different versions of a trial. Typically, the name of the factor details which aspect of the trial will be varied (e.g. stimuli position, size, image category, etc). The levels of the factor then describe the characteristics of the change (left/right, small/medium/large, happy/sad, etc). The more levels a factor has, the more (trial) variations exist and a larger stimulus space is created. This also means that a factor must have at least 2 levels to extend the overall stimulus space.
In Labvanced, there are two ways to divide up your factors during the task setup:
- Factors: Are typically the independent variables of interest, key to the experimental question / hypothesis and are created in the top section of the editor under
Factors. - Randomization factors: Are introduced to create variations in the experiment in order to reduce bias, such as randomizing the position of the ‘correct’ image and are created under
Randomizations.
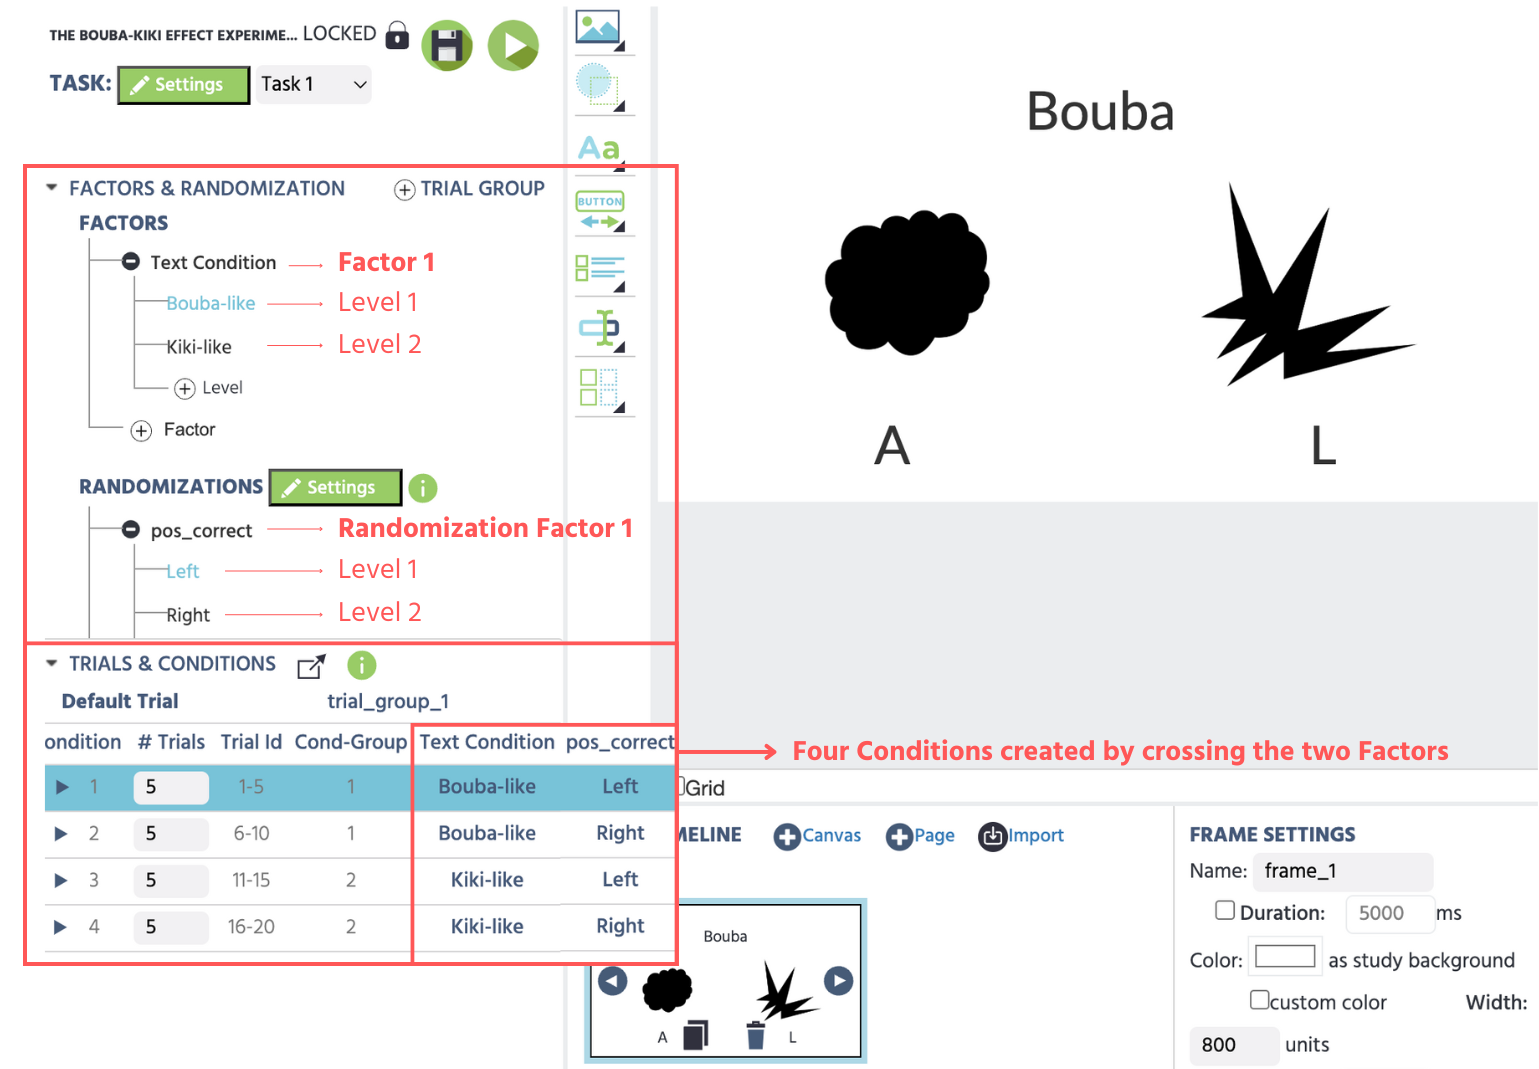
The image above shows the following set up:
- Main Factor =
Text Condition(the type of word that will be shown)- Level 1 =
Bouba-like - Level 2 =
Kiki-like
- Level 1 =
- Randomization Factor =
pos_correct(position of the correct image)- Level 1=
Left - Level 2 =
Right
- Level 1=
Based on that, the Trials & Conditions table is updated to create 4 conditions by crossing the Factors above and we update the #Trial value (second column) so that 5 trials per condition are shown.
Note on Implementation - The difference between fixed factors and randomization factors during experiment run time: Fixed factors generate more trials when the task is executed, while random factors only generate more trial possibilities for the system to choose from for each trial. For example, if the factor "position" with the levels "left" and "right", is fixed, a subject would see a "left" variation AND a "right" variation of the trial. However, if the factor "position" were random, the subject would see a "left" variation OR a "right" variation of the trial, randomly. For more information on factor randomization, please see the section on trial randomization.
Technical Note / Extra Info: A trial group must have at least one fixed factor and each factor must have at least one level. Labvanced automatically does this for you and you can go in and rename them. While this distinction does not affect how many trial variations are defined, it will affect how many trials a subject sees when the task is executed.
Randomizations and Randomization Factors
The Randomizations section is the part of the editor you can use to create the factors for randomizing your experimental design. A popular example is varying the target stimuli location randomly, such as the position of the correct image being either on the left or right side of the frame.
For more information about the Randomizations section and the settings offered, refer to this page here.
Factor-related Variables
Importantly, each factor is linked to a factor variable. This is useful for two main reasons.
- Controlled Events: Events can then be customized to certain conditions (you can instruct the experiment to do something using an If…Then event where IF the factor of "Image Category" equals level "house", THEN something happens).
- Data Analysis: Each trial records the value of the given factor, so that later the experimenter can easily separate different conditions when looking at the dataset.
When adding a Factor to a trial group, you can choose to reuse an existing factor variable or create a new variable. Factor variables can be linked within or across tasks, but it is important to know that a change of a linked factor variable will trigger changes in all tasks and trial groups where the factor is used.
Levels
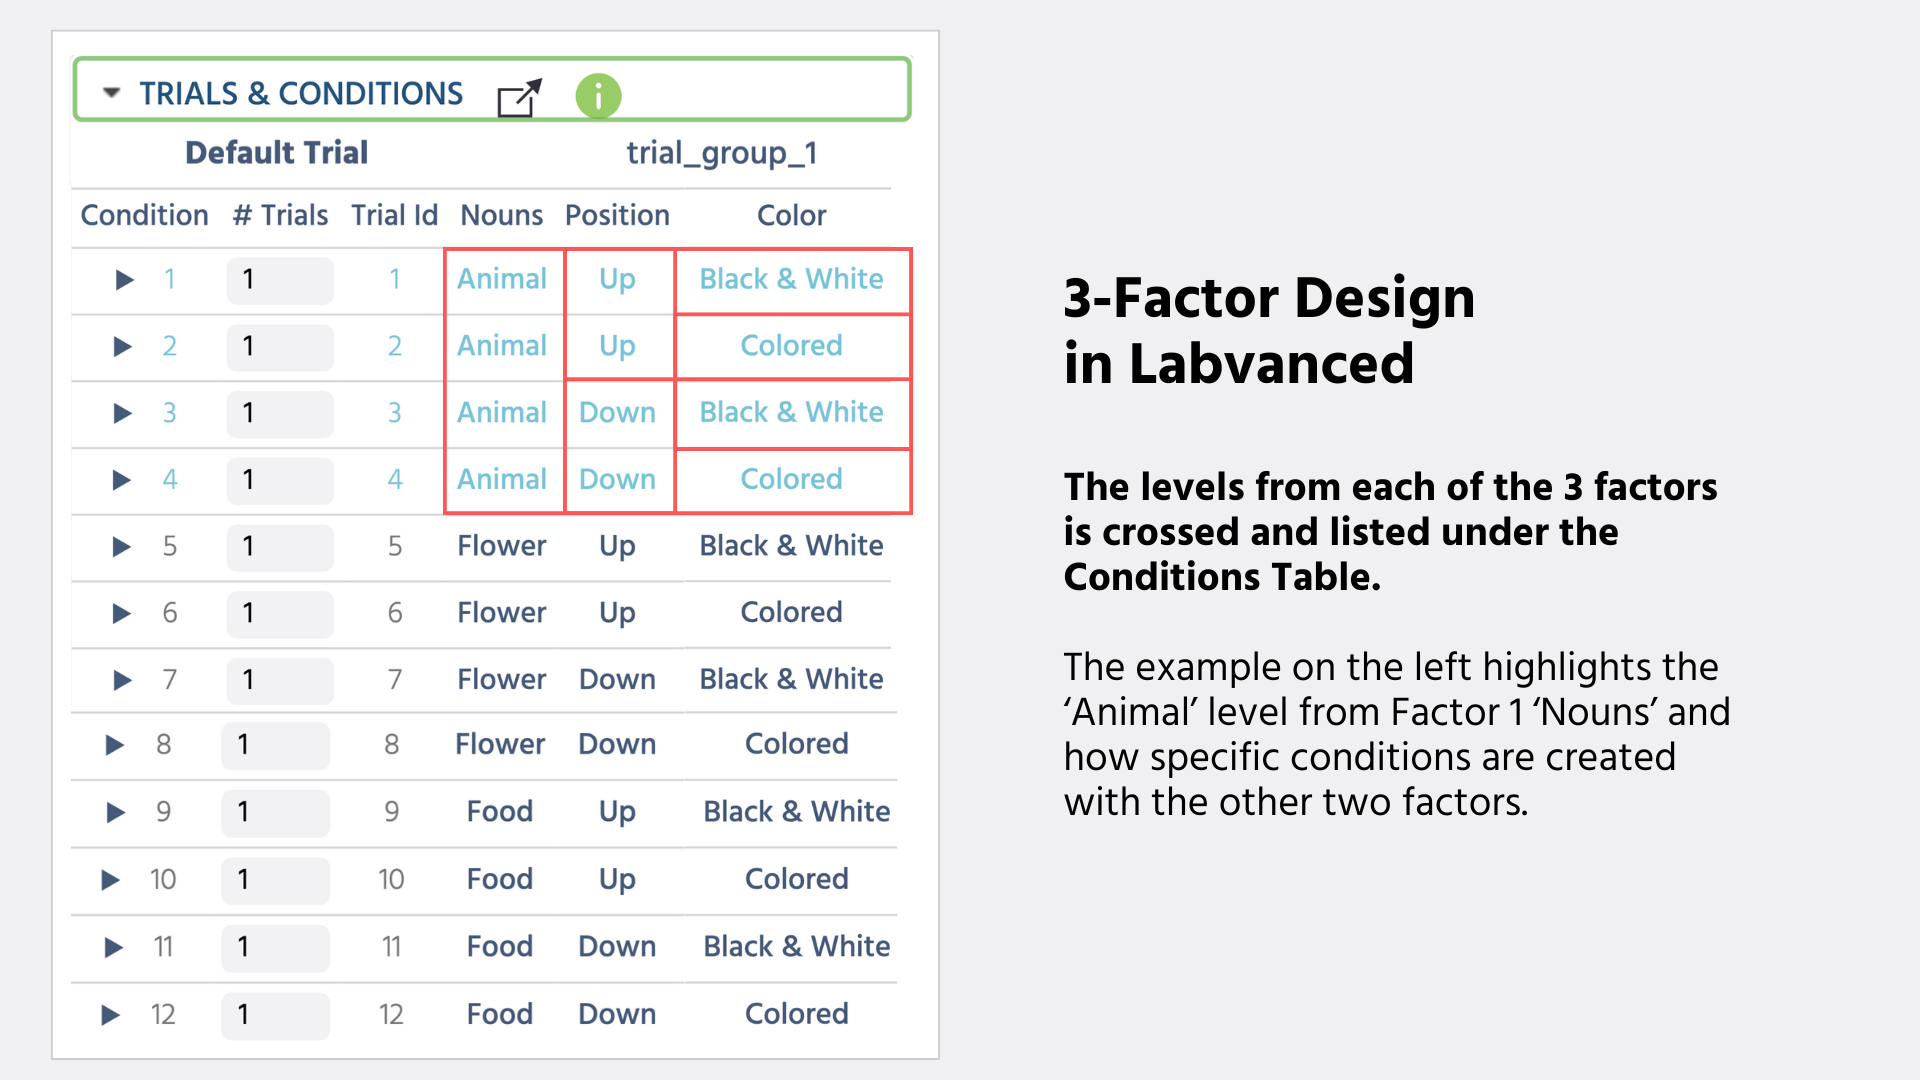
Levels are the possible values for each factor and determine the characteristics of each factor. The factor "Nouns" could, for instance, have the three levels: "Animal / Flower / Food". If this factor is the only factor in the trial group, a condition is automatically created for each level, which is then displayed in the Condition Table at the bottom left of the editing screen. The image below demonstrates this with 'Factor 1' and its 3 levels. In a multi-factor design, additional factors and levels can be created, also demonstrated in the image below:
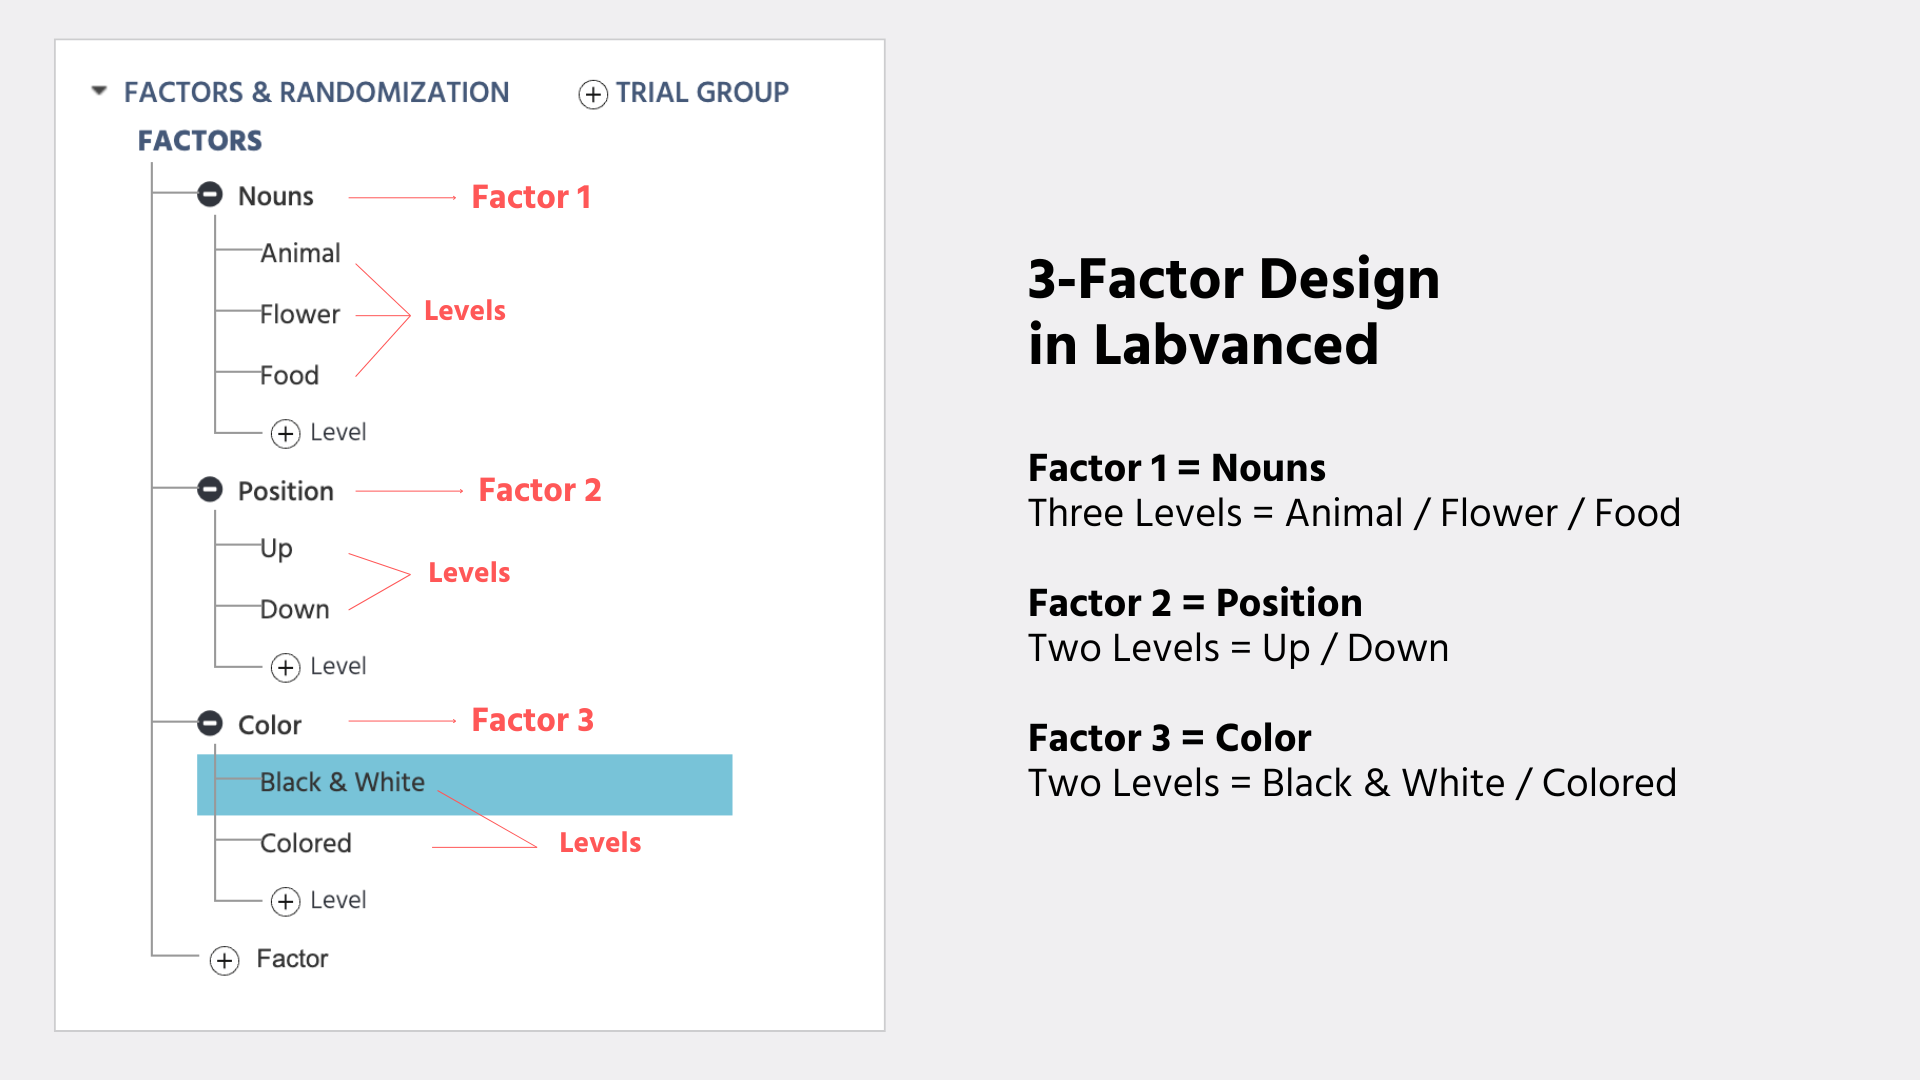
If several factors are created, each level of a factor is combined with all the levels of the other factors within the factor group (the factors cross). In a 3-factor design with factor "Nouns" having 3 levels, factor "Position" with 2 levels, and factor "Color" with also 2 levels, there would be a cross of 3 x 2 x 2 = 12 conditions in total. The Conditions Table automatically updates to match what you have set up with your Factors and Levels. The image below depicts the first four conditions as the variations for the Level Animal:
Usage: To define the exact impact on study design that a factor level will introduce, you can click on the factor level in the factor tree and then modify the objects presented in the editor on the current frame(s). The changes will affect all trials and conditions in which the respective factor has the chosen level. This approach is particularly useful when a stimulus variation is dependent on the level of factor, but not on a specific condition or a single trial.
📌Hands-on Example: Adding level-specific instructions and setting up target image randomization using levels: The one-minute video below demonstrates how you can quickly add variations to your experiment using Levels in Labvanced. As shown in the video, you can begin by first clicking on a Level and give it instructions specific to that level. For example, we click on the Happy level and then we type in the instructions ‘Click on the happy image.’ Then, we click on the Sad level and type in ‘Click on the sad image.’ After that, we change the location of the Target Image under the Right level under the Randomizations and then we proceed to see how the experiment structure is automatically updated across all trials with just a few simple clicks.
Conditions
As alluded previously, the conditions are determined by the number and crossing of factor levels. Each condition is clearly defined by the values (factor levels) of all factors in its trial group.
Conditions are listed under the Conditions Table - see the upcoming section.
Usage: To make changes to the individual conditions, users can click on the condition via the Conditions Table and then make changes to objects on the canvas. The changes made will only apply to the selected condition (i.e. all the trials in that condition). This is a precise way to make changes to collections of trials at once.
📌 Hands-On Example– Uploading stimuli to specific levels and objects: In the video below we develop the experiment design by uploading image stimuli to the relevant condition.
For more information about adding images to trials, refer to this section.
Workflow Tip: Give your stimuli name coded names or follow some kind of naming convention that follows your experiment structure. Having files named to reflect the experiment design will help you stay organized and efficient.
Condition Table
The Condition Table can be used to modify the middle layer(s) of the task hierarchy, specifically, conditions and trials. Due to the hierarchical nature of a task, the crossing of the factor levels generates the conditions separately for each trial group. These are then shown in the Condition Table at the bottom left of the task editor. Whenever there is a change in the Factors, the Condition Table will update automatically. For each condition, the number of trials can be defined separately. It can also be set to 0 if some conditions should not be shown at all.
Here are the column titles and their descriptions:
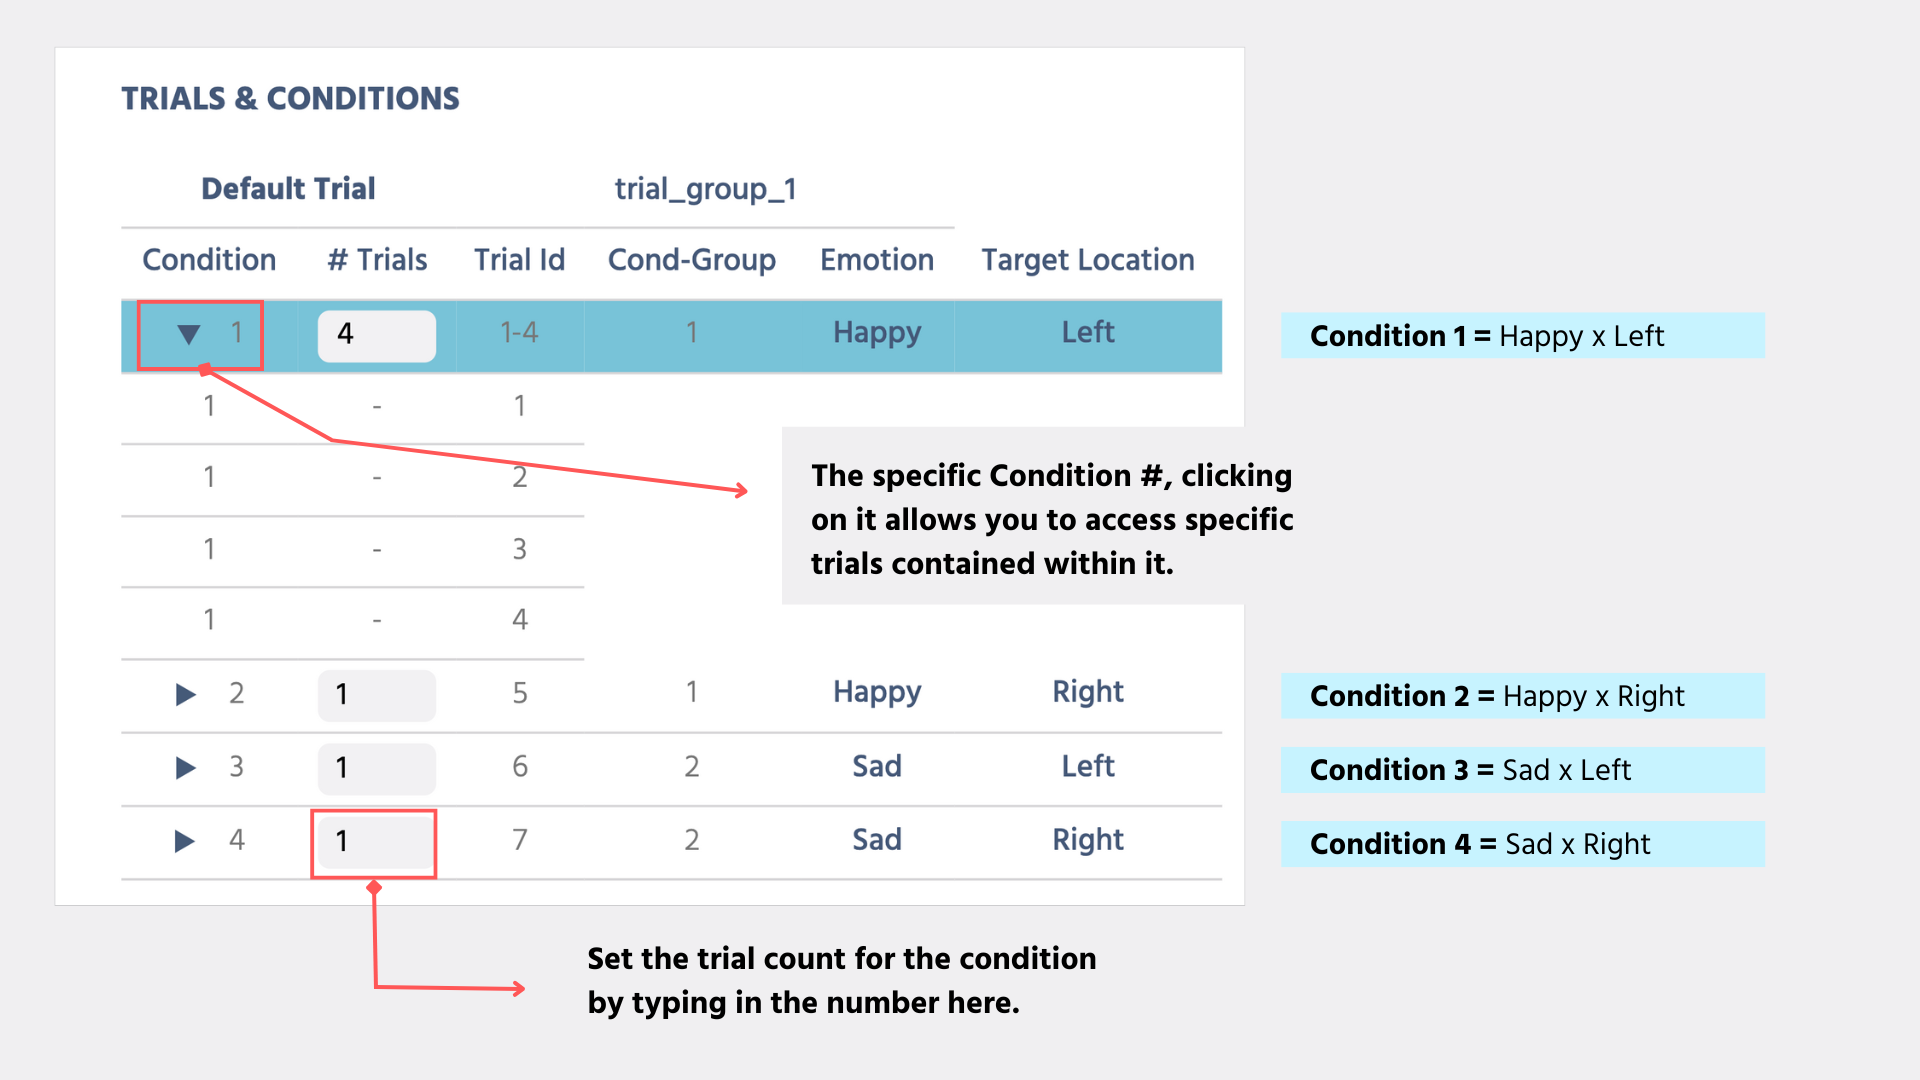
- Condition: The specific Condition #, clicking on it allows you to access specific trials contained within it.
- #Trials: The # of Trials within a specific condition. You can set the number of trials per condition here.
- Trial Id: The Trial ID is automatically updated to match the number of trials you specified in the second column.
- Cond-Group: Refers to the Condition Group based on the factors you created.
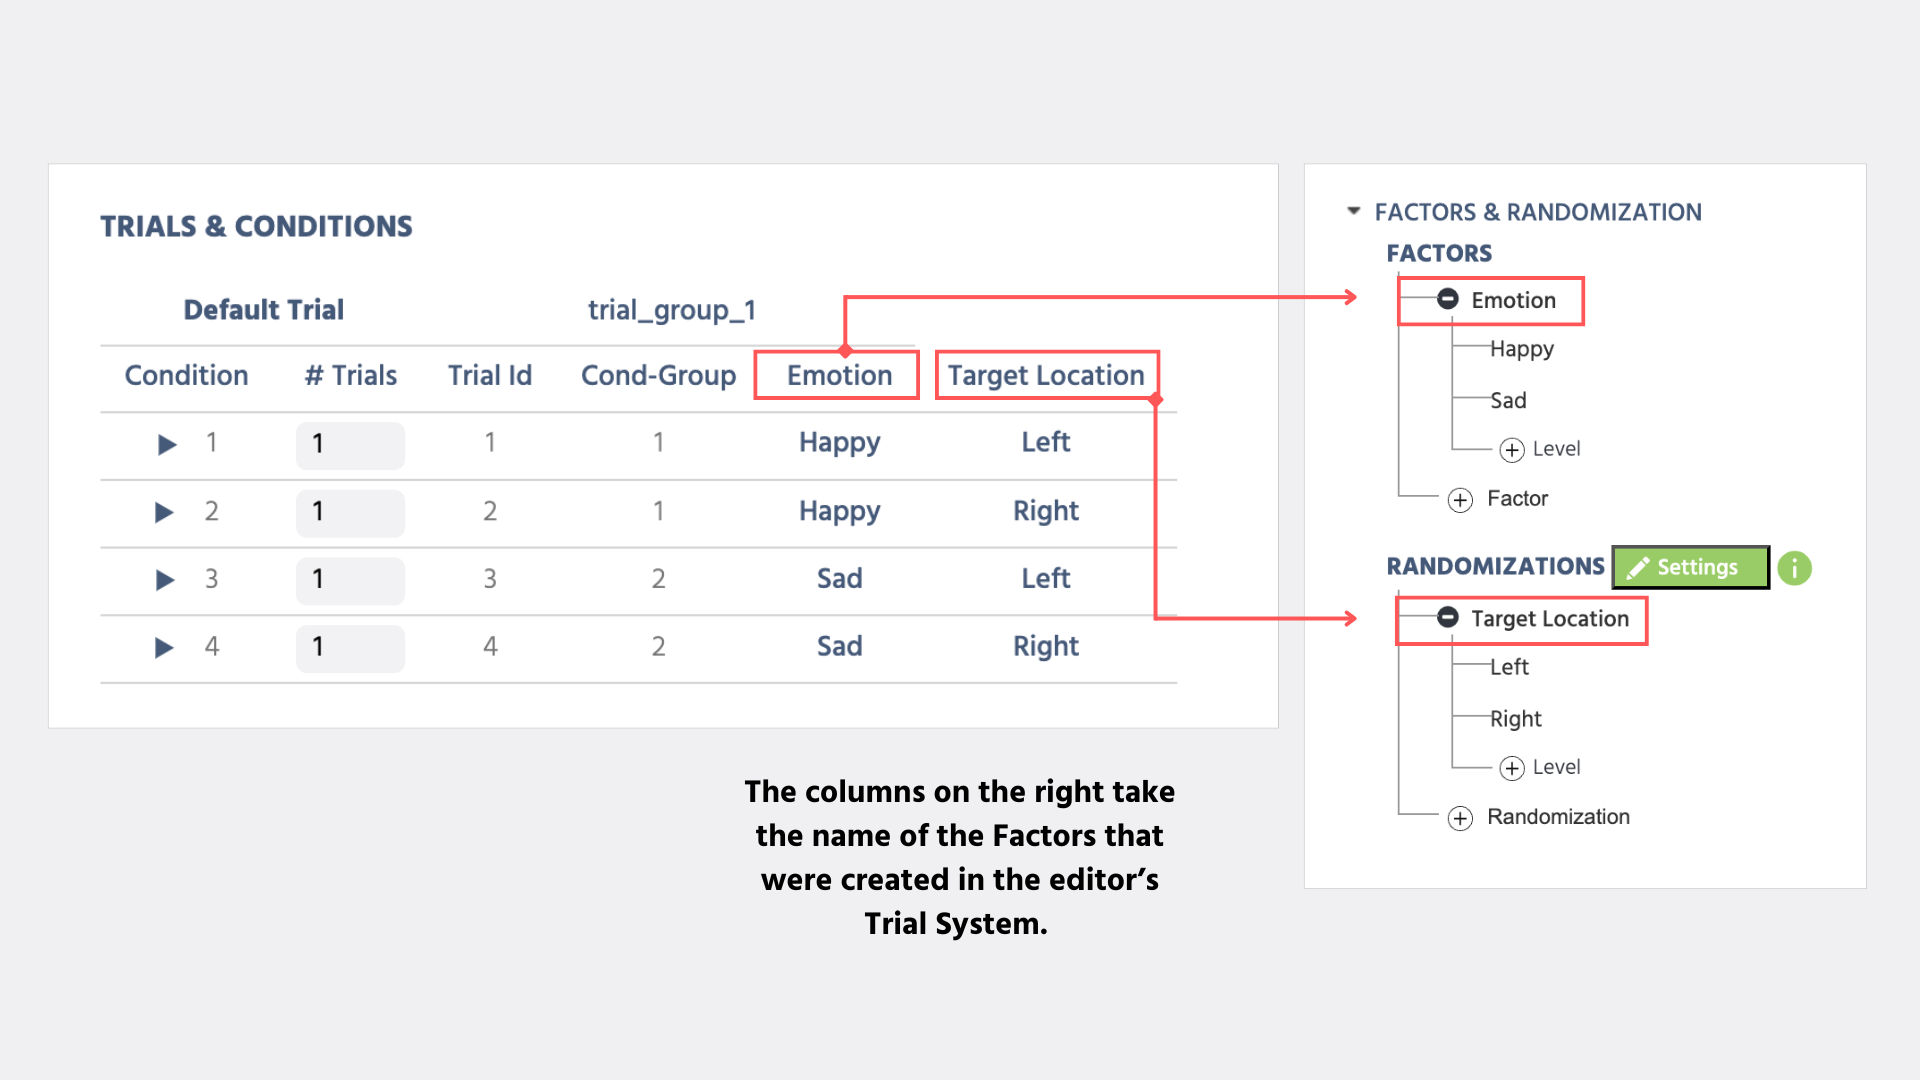
- Factor 1 (Emotion) = This column will take on the name of the
Factoryou created. Underneath it, the different levels are listed. - Factor 2 (Target Location) = Takes on the name of the second
Factoryou created with its respective levels.- Note: The Factor columns here automatically expand to reflect your experiment design and the factors unique to your study.
For information about the default trial, see the next section.
Default Trial
The Condition Table is also grouped according to trial groups and each trial group has exactly one "default-trial" in the Condition Table. The default trial is located in the first row for each trial group, above the conditions.
⚠️⚠️IMPORTANT NOTE: When the default trial is selected, all of the changes made are applied to all trials in the trial group. Any (trial, condition, level) variations, which were made before selecting the default trial will be overwritten by changes in the default trial, so be careful!
Overall, modifying the default trial resets all trials in a trial group to the same "default" value and all trials within a trial group are selected and edited simultaneously. This is useful to define the rough overall frame structure.
Workflow Tip: It is most reasonable to place new Objects first in the default trial first and then adjust for desired variations while selecting the Condition or a specific trial.
📌 Hands-On Example– Adding a fixation cross for all trials: The video below demonstrates how adding a fixation cross frame via the default trial is automatically applied to all the other conditions and trials as well.
Trials
Trials are located within the Conditions and are the most basic unit in the Trial System hierarchy. Each condition is created by default with one trial. The number of trials per condition can be adjusted in the Condition Table.
Usage: If there are several trials within one condition, the condition can be opened (expanded) in the "Condition Table" and individual trials can be selected. Consequent changes to the canvas and objects will then only apply to this particular trial.
Generate Trials by Adding Stimuli
The trial structure can also be created automatically via the file manager and the integrated multi-select function. This is useful if the variation is produced by different stimulus content (different images, videos, sounds etc.). To do so, an image, video or sound object (container) must be selected, then the file manager must be opened via the folder icon in the Object Properties panel. Then select several (2 or more) pictures/videos/audio files and click on the "Assign" icon (grid symbol with arrow) in the lower right corner.
A new menu will open up asking you how to use these multiple selected files. Here you have 3 main options how to assign / use the selected files, with some sub-options, as shown in the image below:
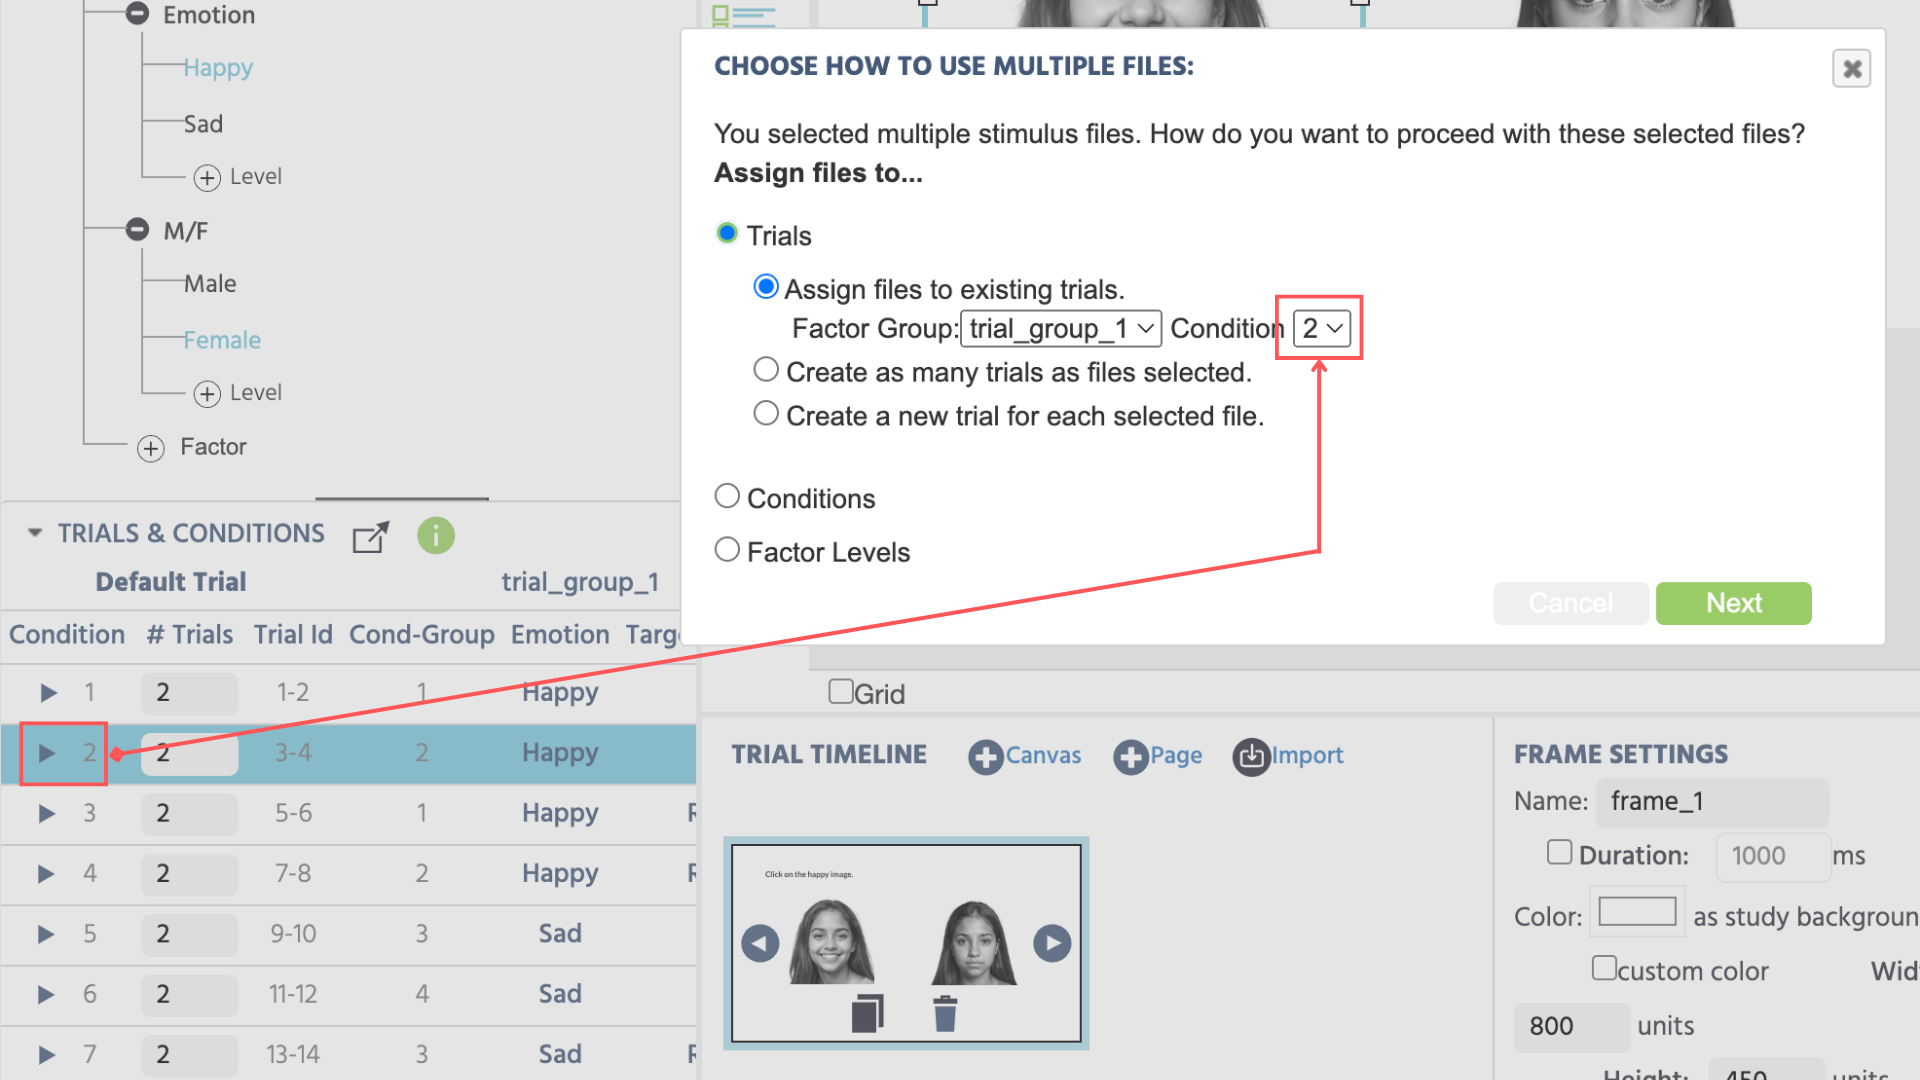
The image above shows option A. Trials and specifies to assign them to Condition 2 because that’s what’s selected in the ‘Trials & Conditions’ table on the bottom left.
A. Trials: Assign the Files to Trials
- Assign the files to existing trials: The image/video/audio files will be assigned to already existing trials in the selected condition.
- Create as many trials as files selected: The image/video/audio files will be matched to the number of trials in the selected condition. There will be exactly 1 trial for each selected file. Former trials in the condition will be removed. If you have created your Factors, you can also specify under what Condition the images should be uploaded (as in the image above).
- Create a new trial for each selected file: For each selected image/video/audio file, a new trial will be added to the selected condition. The new trials will be appended to existing ones.
B. Conditions: Assign the Files to Conditions
- This option assigns the files to a selected factor group and existing conditions.
C. Factor Levels: Assign the Files to Factor Levels
- Assign files to existing factor levels: The images/video/audio files will be assigned to already existing levels in the selected factor.
- Create new levels within an existing factor: For each image/video/audio file, a new level will be added to the selected factor. The new levels will be appended to existing ones.
- Create a new factor and new levels: A new factor will be created. For each image/video/audio file, a new level will be added to this newly created factor. There will be exactly 1 factor level for each selected file.
After choosing the overall assignment method, you can determine which file should be assigned to which trial, condition, or factor level. The respective menu will display two lists, one for the selected files (right), and another for the assignment items (left). You can then drag & drop individual files from the right to the left, manually determining which file should be associated to which trial, condition, or factor level. However, you can also use the "Auto Assign" button, which will assign all files automatically in a random order. This way you can set up your stimulus associations quickly.
📌 Example: Using an Object in the editor to assign files to your trials: The video below gives you an example of how you can click on an image object in the Trial System and upload your stimuli in Labvanced:
Working with Trials
After the factor groups, factors, levels, conditions, and trials are set up and frames and objects are added, the next step for you is to fine-tune and modify the elements using the Object Properties such that different trials will show either different stimuli variations such as: the same stimuli in different positions, with different sizes, or other such modifications. Here it is of central importance to select the appropriate modification level for each modification made. Overall, there are 4 levels of modification:
- Trial-Group-Modifications using the "Default Trial": Changes all trials within the selected trial group.
- Factor-Level-Modification: Changes all conditions (and trials within these) in which the selected factor possesses the selected factor level.
- Condition-Modification: Changes all trials within the selected condition.
- Trial-Modification: Changes only the selected trial.